|
Leena's Pattern Drafting Lesson:
Drafting Patterns For Basic Sleeve
 Metric
conversion table Metric
conversion table
Take patterns for the garment you are going to sew. Measure
the length and width of the armscye from the pattern. Refer to the picture
under.
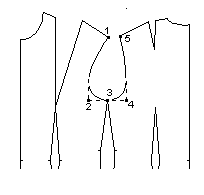
1-3-5 = armscye length 2-3-4 = armscye width
2-3 and 3-4 = 1/2 armscye width Divide armscye length by 3 to get
the cap height. Measure the subject's biceps circumference. Add
6-8 cm ease to it. Measure the subject's sleeve length from the cap top
to the wrist.
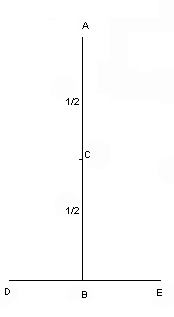
Draw a vertical line A-B corresponding to the subject's
sleeve length. Divide it in half and you get point C. Draw a horizontal
line D-E corresponding to the subject's biceps measurement (biceps circumference
+ ease)
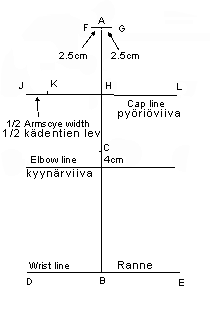
Measure from point C downwards 4 cm and draw the elbow line. Measure
2.5 cm from point A to the left and to the right and you get points F
and G. Measure 1/2 armscye width from point J to the right to get point
K.
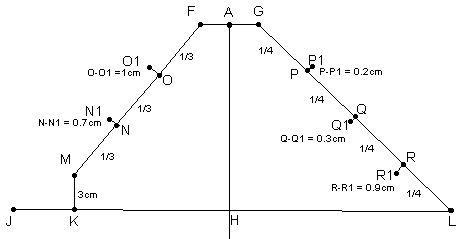
-
Measure cap height from point A downwards and you get
point H.
-
Draw a horizontal line J-L which corresponds the subject's
biceps measurement (biceps circumference + ease).
-
Draw a vertical line from K upwards 3 cm and you get
point M.
-
Divide the line F-M in three and you get points N and
O.
-
Divide line G-L in four and you get points P, Q and
R.
-
The points N1, O1, P1, Q1 and R1 are situated as in
the picture above: N1 0.7cm left from N. O1 1cm left from
point O. P1 0.2cm right from P. Q1 0.3cm left from Q.
R1 0.9cm left from R.
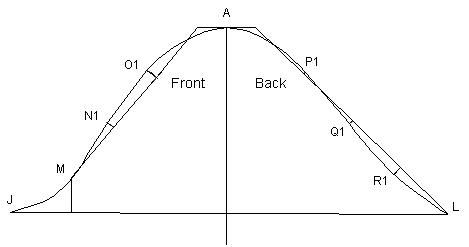
Draw the sleeve cap smoothly through points J - M - N1-
O1 - A -P1 - Q1 - R1 - L as in the picture above.
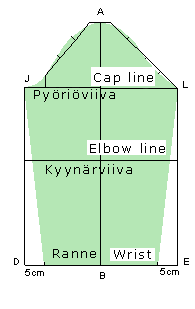
Draft rest of the sleeve according to the picture
above.
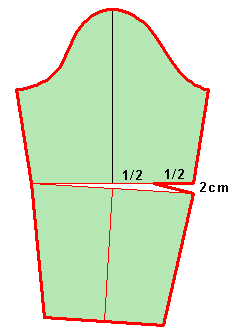
If you want to draft an elbow dart to the sleeve, cut the
sleeve along elbow line and rotate bottom piece 2 cm clockwise, refer
to the picture. When drafting the new outline of the sleeve, notice the
place of the elbow dart apex.
Altering a basic sleeve into a sleeve for dropped shoulder
Lower sleeve cap with 3-6 cm. Lengthen shoulder with
the same amount. Look at the picture below.
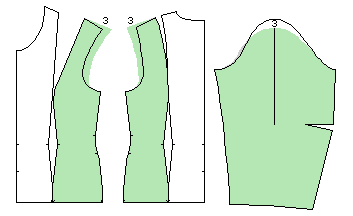
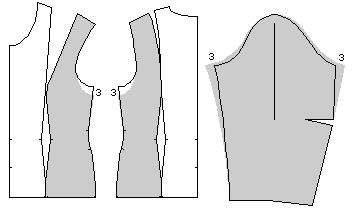
Making armscye larger/smaller
This is the
rule you have to follow :
If you lower the armscye of the bodice, you have to broaden
the sleeve at the armpit with the same amount. This makes the sleeve larger
at the armscye. Refer to the picture below where the sleeve has been broadened
at the armpit with totally 6 cm (3 + 3 cm).
And vice versa: If you reduce the sleeve at the armpit,
you have to raise the armscye of the bodice. This makes the sleeve smaller
at the armscye. Please notice that if you lower the armscye of the bodice
too much, you will not be able to raise your hand. So be careful when
lowering the armscye.
| ![]() Site
Map
Site
Map


