MEASURING
 Click
here
to move to the measuring page. Read carefully the measuring instructions.
To draft patterns for pants, you have to take the measurements listed
in the table below. To keep the pictures clear and readable the measurements
are given only in centimeters. You can change centimeters to inches
using formula 1 cm = 0.4 inches.
Click
here
to move to the measuring page. Read carefully the measuring instructions.
To draft patterns for pants, you have to take the measurements listed
in the table below. To keep the pictures clear and readable the measurements
are given only in centimeters. You can change centimeters to inches
using formula 1 cm = 0.4 inches.
ADDING EASE
You would not be able to wear the pants if the patterns
were drawn exactly to your body measurements. Therefore you have to
add ease to some of the measurements. The basic pants usually are
a tight fitting garment and therefore only a small amount of
ease is added.
ADD TO THE WAIST CIRCUMFERENCE: 2 cm
ADD TO THE HIP CIRCUMFERENCE: 4 cm
Do not add any ease to other measurements.
Write down the measurements in the table below.
|
|
Body measurement
|
Body measurement + ease
|
|
WAIST CIRCUMFERENCE
|
*
|
+2 cm=
|
|
ABDOMEN CIRCUMFERENCE
|
*
|
|
|
HIP CIRCUMFERENCE (if your abdomen circumference is
more than your hip circumference, use it for your hip circumference)
|
*
|
+ 4 cm=
|
|
CROTCH DEPTH
|
*
|
|
|
ABDOMEN HEIGHT
|
*
|
|
|
HIP HEIGHT
|
*
|
|
|
OUTSIDE SEAM LENGTH
|
*
|
|
|
KNEE CIRCUMFERENCE
The desired finished leg circumference at knee
|
*
|
|
|
CUFF CIRCUMFERENCE
The desired finished leg circumference at cuff
|
*
|
|
DO THE FOLLOWING CALCULATIONS:
Round the measurements up to the nearest 0.5 cm.
|
|
Body measurement + ease
|
Divided by 8
|
Divided by 4
|
Divided by 20 = x
|
|
Waist circumference
|
*
|
*
|
|
|
|
Hip circumference
|
*
|
*
|
*
|
*
|
|
Knee circumference
|
*
|
|
*
|
|
|
Cuff circumference
|
*
|
|
*
|
|
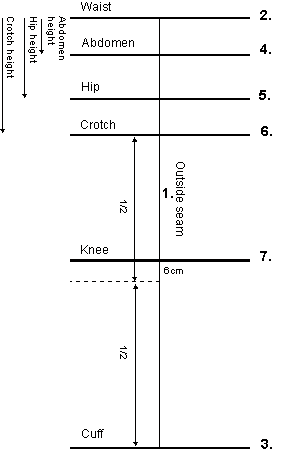
DRAFTING THE PATTERNS
Draw a frame first.
Start by drawing a vertical line that corresponds
to the outside seam length of the pants.
Draw a horizontal line at the top of the vertical line. This
is the waist line of the pants.
Draw a horizontal line at the bottom of the vertical line. This
is the cuff line of the pants.
Measure down from the waist line a distance equal to the abdomen
height and draw a horizontal line. This is the abdomen line.
Measure down from the waist line a distance equal to the hip
height and draw a horizontal line. This is the hip line.
-
Measure down from the waist line a distance equal to the crotch
height and draw a horizontal line. This is the crotch line.
Find the point midway between the crotch line and the cuff
line. Draw the horizontal knee line 6 cm above this point.
FRONT PIECE
Waist and dart
Divide the waist circumference (+ ease) by 8. On the waist line,
measure this distance to the left from the pants' center line.
Mark this point as the center front point of the waist.
Divide the waist circumference (+ease) by 8 and add 3 cm. On
the waist line, measure this distance to the right from the pants'
center line. Mark this point as the side front point of the waist.
Of the extra 3 cm, +2 cm is for the dart and +1 cm is to move
the side seams 1 cm towards the back to prevent them from showing.
The side point is raised by 1 cm.
On the waist line, measure 4.5 cm to the right from the
pants' center line and start the front dart from there. Make the
dart 2 cm wide. The dart extends from the waist line to the abdomen
line. Draw the right side of the dart so that it forms a right
angle where it meets the abdomen line.
Hip
Divide the hip circumference (+ ease) by 8 and subtract 2 cm.
On the hip line, measure this distance to the left from the pants'
center line. Mark this point as the center front point of the
hip.
Divide the hip circumference (+ ease) by 8 and add 2 cm. On
the hip line, measure this distance to the right from the pants'
center line. Mark this point as the side front point of
the hip.
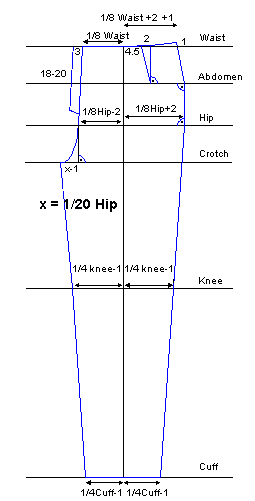 Crotch
Draw a vertical line from the center hip point downwards to
the crotch line and mark this point. From the marked point, measure
x-1 cm to the left and mark. Mark this point as the tip of the
front crotch curve. X is calculated by dividing the hip
circumference (+ ease) by 20.
Knee and cuff
Divide the desired knee circumference by 4 and subtract 1 cm.
On the knee line, measure this distance to the left and to the
right from the pants' center line. Mark these points as the knee
points of the front pant.
Divide the desired cuff circumference by 4 and subtract 1 cm.
On the cuff line, measure this distance to the left and to the
right from the pants' center line. Mark these points as the cuff
points of the front pant.
Now you are ready to draft the front piece pattern. Follow the
points that you have marked according to the above instructions.
If the difference of the waist and the abdomen/hip circumference
is a lot, there may be a disturbing angle at the side seam at
the abdomen line. In such a case round the line a bit outwards
between the waist and the abdomen line (not marked in the picture).
Curve the inseam a bit inwards between the crotch and the
knee (not marked in the picture).
Draft the facing for the zipper, 3 cm wide and 18-20 cm high
(according to the length of the zipper you are going to use),
at the top of the front pant's center line .
BACK PIECE
Draft the back piece pattern in the same frame with
the front piece.
Waist points of the center back and the side
back seam
-
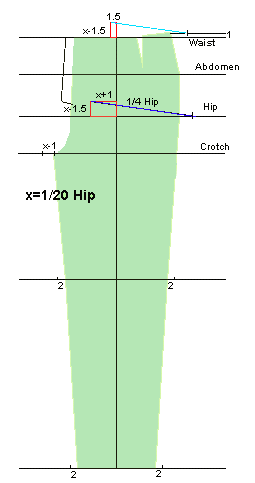 Draw
a small rectangle, 1.5 cm wide and x-1.5 cm high, to the left
starting at the top of the pants' center line (drawn in red
in the picture). Mark the top left corner of this rectangle
as the waist point of the back center seam.
Draw
a small rectangle, 1.5 cm wide and x-1.5 cm high, to the left
starting at the top of the pants' center line (drawn in red
in the picture). Mark the top left corner of this rectangle
as the waist point of the back center seam.
Divide the waist circumference by 4, add 2.5 cm and
subtract 1 cm. Trace this distance from the previous point
towards the waist line at side raised by 1 cm (as in the front)
(drawn in cyan in the picture below). Of the distance +2.5 cm
is for the dart and -1 cm is to move the side seams backwards
(the corresponding amount was added to the front waist). Mark
the intersection of this line and the waist line (raised by
1 cm, as for the front) as the waist point of the back side
seam.
Hip points of the center back and side back seams
Draw another rectangle, x+1 cm wide and x-1.5 cm
high, to the left from the intersection of the hip line and the
pants' center line. Mark the top left corner of this rectangle as
the hip point of the back center seam.
Divide the hip circumference by 4. Trace this distance
from the previous point towards the hip line at side (drawn in blue
in the picture below). Mark the intersection of this line and the
hip line as the hip point of the back side seam.
Back crotch
Measure a distance of x-1 cm to the left from the
tip of the front crotch curve and 1-1.5 cm downwards from it. Mark
this point as the tip of the back crotch curve. X is calculated
by dividing the hip circumference (+ ease) by 20.
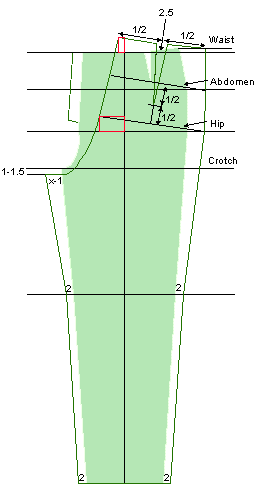 The
knee and the cuff points of the back pant
The
knee and the cuff points of the back pant
Mark these points 2 cm to the left and to the right
from the corresponding points of the front pant.
Now you are ready to draft the back piece pattern. Follow the
points that you have marked according to the above instructions.
Draft a smooth line from the waist point to the hip point. The abdomen
line of the back pant starts from the intersection of the back side
line and the frame abdomen line and is parallel to the hip line
of the back pant.
Draw the back center seam smoothly according to the
picture. Back dart is 2,5 cm wide. Place it at the midpoint of the
back waistline. Vertically the back dart extends to the midpoint between
the abdomen and the hip height.
Note : Please notice that the back piece inseam length measured
from the crotch to the knee is to be 1-1.5 cm shorter than that
of the front inseam. The reason for this is that it reduces the amount
of fabric under the buttocks in order to achieve a better fit of the
back pant. You must stretch the back inseam from the crotch to the
knee when attaching it to the front inseam.
Sewing instructions are also included in this web-site.
To view them
click here
.
