|
Sewing Instructions For Maternity
and Nursing Garments
Copyright
©1998-2000 Leena Lähteenmäki, Järvenpää
Also refer to sewing instructions for
Women's Vol. 1 macros and general sewing instructions
You can sew most of the garments in the maternity macro collection by
following the applicable  sewing instructions for Women's Vol. 1 macros.
On this page we give instructions to sew details which are not covered
in the Women's garment instructions. For some details we refer to the
general sewing instructions page
.
sewing instructions for Women's Vol. 1 macros.
On this page we give instructions to sew details which are not covered
in the Women's garment instructions. For some details we refer to the
general sewing instructions page
.
Not-pregnant option
 In
most of the maternity macros there is a "not-pregnant-option". In garments
meant for pregnant women extra ease has been added - not only to the waist
circumference - but to
front height , too. Otherwise the front hem would rise higher than
the rest of the hem. In
most of the maternity macros there is a "not-pregnant-option". In garments
meant for pregnant women extra ease has been added - not only to the waist
circumference - but to
front height , too. Otherwise the front hem would rise higher than
the rest of the hem.
The amount of eased added to the front height is determined by an average
value, and may not work in all situations. Therefore, it is important
that you check that the
hem is parallel to the floor all around the garment when fitting
the garment on.
If you use the garment
after your pregnancy, shorten the hem at the front, if needed.
The bottom edges of the pockets have to be parallel to the hem.
Therefore, do not fasten the pockets until you are sure that front height
is OK and you can align pockets according to it.
Hint : If you are sewing a garment for a person who is not pregnant,
but has a round or tilted abdomen, choose "pregnant-option" and check
that the hem is parallel to the floor when you try the garment on the
subject. Straighten the front hem if needed.
Measuring
Waist circumference is not asked in the maternity macros. These garments
have a loose waist construction.
The macro estimates the waist circumference of
maternity pants and skirt according to the hip circumference measurement,
and the necessary amount of extra ease is added. In the dialog box, therefore,
the amount of
added front height and width is asked. The default values are 3cm/1.25"
and 6cm/2.5" per pattern piece (i.e. 1/2 of the front piece). So, for
example, 6cm/2.5" of added front width means that the estimated pattern
waist circumference has been increased by 12cm/5".
You can change these measurements according to the phase of your pregnancy
or when sewing garments for a person with a round or tilted abdomen. To
be sure that these values are OK,
measure the abdomen circumference of the front and back patterns,
multiply the measurement by 2 (because the patterns are 1/2 patterns).
Compare this value to the circumference measurement of your abdomen. Remember
that there is a handy measuring tool (Draw/Dim) in the PatternMaker editing
tools which you can use to measure the patterns on screen.
 The
circumference of the abdomen of the patterns must be 2-4cm/0.75-1.5" more
than the abdomen circumference of your body. If you need to increase or
decrease the the amount of added ease on the abdomen level, change the
added front width value in the measurements dialog box. If you need to
add only a little (less than 5 cm/2"), don't change the added height value.
If you need added width of more than 5cm/2" (in addition to the default
6 cm/2.5"), change the added front height value so that it is 1/3-1/4
of the added front width value. Do the fine adjustment when fitting the
garment on. The
circumference of the abdomen of the patterns must be 2-4cm/0.75-1.5" more
than the abdomen circumference of your body. If you need to increase or
decrease the the amount of added ease on the abdomen level, change the
added front width value in the measurements dialog box. If you need to
add only a little (less than 5 cm/2"), don't change the added height value.
If you need added width of more than 5cm/2" (in addition to the default
6 cm/2.5"), change the added front height value so that it is 1/3-1/4
of the added front width value. Do the fine adjustment when fitting the
garment on.
If you are not pregnant...
You can
type "0" (zero) as the added front width and/or height value.
The result will then be patterns for normal pants or skirt. If you
are
not pregnant but have a round or tilted abdomen and you want
to have extra ease at the abdomen area of the garment, check the
correct amount of added front width and/or height by measuring the
patterns and your body. Start with an added front width of "0" (zero)
and added front height of 3cm/1.25". Measure the patterns and your
body and change these values until you are satisfied with the abdomen
width and height of the pattern.
Note
! Do not add anything to the body measurements when typing them
in the measurements dialog box. The macro adds the needed moving
and design ease amounts on top of the body measurements.
When wearing the pants and the skirt you can
adjust their waist using the hook-and-loop tape construction
at the waistband.
|
Dress with bow
Sew darts of the front bodice. Iron.
Continue sewing the bow and fasten it to the bottom edge of the front
bodice. If you are using lightweight fabric, iron interfacing to the wrong
side of the bow pieces
(Picture 1).
Fold the bow piece in half lengthwise, right sides together. (
Picture 2a ). Sew short edges of the bow. Leave the long edge raw.
Turn the bow right side out, open the seams well and iron. Fold the bow
fastening band in half lengthwise, right sides together, and sew the long
edge (
Picture 2b ).
Leave the short edges raw. Turn the band right side out, open seams
well and iron. Center the seam of the band (= this will be the bottom
side of band).
 Position one short edge of the band at the center of the bottom edge of
the front bodice, with the seam of the band upwards. Fasten the band to
the front bodice with a horizontal seam (
Picture 3a ).
Position one short edge of the band at the center of the bottom edge of
the front bodice, with the seam of the band upwards. Fasten the band to
the front bodice with a horizontal seam (
Picture 3a ).
 Place
the bow on top of the fastening band and sew the raw edges to the front
bodice. (
Picture 3b ). Fold the bow according to the picture and turn the
fastening band down. Sew the other short edge of the fastening band to
the front bodice. (
Picture 3c ). Place
the bow on top of the fastening band and sew the raw edges to the front
bodice. (
Picture 3b ). Fold the bow according to the picture and turn the
fastening band down. Sew the other short edge of the fastening band to
the front bodice. (
Picture 3c ).
Fold and baste the pleats of the front hem piece. Put the front bodice
and hem pieces on top of each other right side of the pieces together.
Sew the seam fastening front bodice to front hem.
Continue according to the
sewing instructions
for the dress in the Women's Vol. 1 Macro Collection.
Maternity pants and skirt
You can sew the pants and the skirts either with a plain front or with
a separate embedded front (abdomen) piece. Use stretchy elastic fabric
for the embedded front piece. If the fabric is very thin, cut it on double
fabric.
Pants, embedded abdomen piece
Cut the embedded abdomen piece of elastic fabric on fold without a CF
seam. Put the pattern on the fabric so that the elasticity of the fabric
is horizontal. Cut the bottom pieces of the pants normally. Sew and overlock
the joining seam of the abdomen piece and the front bottom piece. Continue
according to instructions below.
Skirt, embedded abdomen piece
Cut the embedded abdomen piece and the bottom piece of the front skirt
of elastic fabric on fold without a CF seam. Put the pattern of the abdomen
piece on the fabric so that the elasticity of the fabric is horizontal.
Cut the bottom pieces of the skirt normally. Sew and overlock the joining
seam of the abdomen piece and the front bottom piece. Continue according
to instructions below.
Iron interfacing to the wrong side of the waistband. Overlock the edges
of the waist band and the pocket pieces.
Put front pieces of the pants on top of each other right
sides together. Sew and overlock the CF seam. (
Picture 1a ). Iron.
Match the pocket facings to the pocket mouths of the front pants, right
sides together. Sew and overlock pocket mouth. (
Picture 1b ). Use a fabric tape cut from the selvage of the fabric
in the pocket mouth seam. It will prevent pocket mouth from stretching
when the pants are worn. Iron.

Turn pocket facings to the wrong side of the pants and edgestitch pocket
mouths with one or two rows of stitches. (
Picture 2a ). Iron.
Sew waistband to the front pants: put it on the top edge of the pants,
right sides together, and sew. Iron seam allowances upwards (towards the
waist band). Fold waistband in half lengthwise and sew the short edges
of the waistband. Turn the waist band right side out; fold seam allowances
of the waist band inside it and edgestitch along all edges. (
Picture 2b ). Iron.
 Place
pocket bags on top of pocket facings right sides together (
Picture 3a ). Place
pocket bags on top of pocket facings right sides together (
Picture 3a ).
Sew and overlock the round edges of the pocket facings and pocket bags
between the arrows in the picture. Leave the rest of the seam unsewn.
(
Picture 3b ). Iron the pocket bags.
Place the back pieces of the pants on top of each other, right sides
together, and sew the CB seam of the pants.
Picture 4a ). Iron.
Place front and back pants on top of each other right sides together
(
Picture 4b ).
Sew and overlock side seams (
Picture 5a ). Sew and overlock the inside leg seams of the pants
continuously from cuff to cuff (
Picture 5b ).
Overlock the top edges of back pants and pocket bags. Fold into casings
according to marks in the patterns(
Picture 6 ). Sew casing along the pants' waist line. Iron. Thread
elastic to the casing and fasten it with vertical stitch lines at the
ends of the casings.
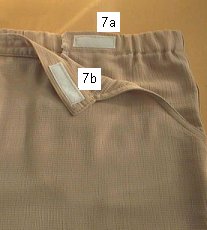
Sew pieces of hook-and-loop tape (Velcro) to the ends of
the elastic edges (
Picture 7 a ) and to the wrong side of the front waistband (
Picture 7 b ).
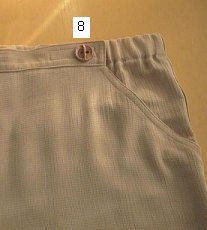
If you want to, sew trimming buttons to the right side ends of the front
waistband (
Picture 8 ).
Sew the waist of the maternity skirt the same way. Sew the skirt otherwise
according to the sewing instructions of the skirt of the
Women's Vol. 1 Macros
.
Jacket or dress with pleats
Fold and baste the pleats of front and back pieces. Sew the button extension
according to the
general sewing instructions
. If you want to sew the jacket/dress which is open all the way CF, cut
the button extension all the way to the hem.
Hint : If you want to, sew a casing for elastic to the hem as in
the picture. Thread the casing with draw string. To make the draw string,
use a length of elastic with fabric at the ends. This way the hem is more
flexible.
Salsa jacket or dress
 Set
your machine to the longest stitch length, and baste along the top edge
of the salsa pieces. Baste again 0.5cm/0.25" from the first basting
line, inside the seam allowance. Gather the stitches until the edge corresponds
to the edge to which it will be joined. Set
your machine to the longest stitch length, and baste along the top edge
of the salsa pieces. Baste again 0.5cm/0.25" from the first basting
line, inside the seam allowance. Gather the stitches until the edge corresponds
to the edge to which it will be joined.
Sew upper salsa pieces to front and back top parts. Sew the bottom salsa
pieces to the hems of the upper salsa pieces. Overlock the joining seams.
Sew and overlock shoulder and side seams of the jacket/dress. Sew and
overlock the sleeve seams. Join the sleeves to the armscyes of the garment.
If you sew a
flat collar for the garment (refer to the green dress in the picture),
cut two copies of it (upper and bottom collars). Iron interfacing to the
wrong side of the bottom collar. Put upper and bottom collars on top of
each other, right sides together, and sew the outer edge of the collar.
Clip the seam allowance along the round edges of the collar. Turn the
collar right side out, open seams well and iron. Edgestitch the collar
if you want to.
Iron interfacing to the wrong sides of the neck facings. Sew the shoulder
seams of the facings. Overlock outer edges of the facings. Open seams
well and iron.
Fold in the seam allowance of the button extensions. Baste. Fold button
extensions along the fold line marked in the patterns on top of the right
side of the garment. Sew across bottom edges of the button extensions
with distance of the hem seam allowance from the edge. Overlock the hem.
Place collar on top of the neck opening of the front bodice and the
button extension bottom collar against the right side of the garment.
Place the neck facing on top of the collar right side down and sew through
all thicknesses at distance of seam allowance from the edge of the neck
opening. Clips the seam allowances at intervals of about 2cm/.75". Finger-press
the seam open, understitch through the facing and the collar and the seam
allowance. Iron.
 Tip:
Understitch through the seam allowances of the facing and collar (for
instructions please refer to
general sewing instructions
). Tip:
Understitch through the seam allowances of the facing and collar (for
instructions please refer to
general sewing instructions
).
If you sew the garment without a collar, finish the neck opening with
the facing, using instructions above.
Turn the button extensions to their right positions and fasten them
to the front pieces along the basted edge. Iron. Fasten buttons and sew
button holes. Edgestitch the neck opening and the button extension, if
you want to. Sew hem with blind stitches of the sewing machine.
nursing garments in general
In the nursing garments there usually are
two-layered fronts: inner and outer. In most cases vertical nursing
openings are in the inner fronts. The outer front lies loose on the inner
front and is fastened to the shoulder seams and to the armscyes. It hides
the nursing openings.
Hint : If you want to sew a "
normal version" of a nursing garment (with no nursing openings),
sew the edges of the nursing opening together, forming a seam.
 Nursing
shirt Nursing
shirt
Cut an extension to the breast feeding opening according to marks on
the patterns i.e. about 5cm/2" downwards from the breast apex (
a-b in picture
1 ). Fold the hem seam allowances of the outer front pieces inwards
twice and sew. Place the outer front pieces on top of the inner front
pieces (the edges of the nursing openings side by side) and baste along
front edges, neck openings, shoulders, armscyes and side seams.
Picture 2.
Iron interfacing to half of the wrong side of the button extension.
Place button extension on top of the front pieces right sides together.
Sew.
Picture 3. Fold in and baste seam allowance from the other
long edge of the button extension. Iron the seam allowance towards the
button extension.
 Fold the button extension lengthwise in two along the
fold line marked in the patterns wrong side in and sew across bottom edge
of the button extension with distance of the hem seam allowance from the
edge. Overlock the hem. Fold the button extension right side out and sew
along the basted seam allowance edge.
Fold the button extension lengthwise in two along the
fold line marked in the patterns wrong side in and sew across bottom edge
of the button extension with distance of the hem seam allowance from the
edge. Overlock the hem. Fold the button extension right side out and sew
along the basted seam allowance edge.
Tip: Finish the edges of the nursing openings
with separate strips of fabric e.g. according to the bound slit instructions
in the
general sewing instructions
.
Sew the rest of the shirt according to the sewing instructions of the
shirt of the
women's vol. 1 macros
.
Nursing bodyshirt
Fold ribbings in half lengthwise, wrong sides together, and mark the
1/2-points of them with pins. Mark in the same way the 1/2-points of the
edges of the front pieces. Pin ribbings to the corresponding edges of
the garment raw edges and marking pins matching. (
Picture 1 ) Sew.
Finger press the seam allowances away from the ribbing and sew through
the garment and the seam allowance with double needle on the right side
of the garment near the joining seam of the ribbing. (
Picture 1a ) Cut away excess seam allowance from the wrong side
of the garment.
Pin the top (outer front) and the bottom front (inner front) pieces
on top of each other with the wrong side of the top front piece against
the right side of the bottom front piece. Baste along armscyes and side
seams. (
Picture 2 ) Handle the front pieces from this point on as a single
piece.
Sew and overlock the shoulder and the side seams.
Iron interfacing on the wrong side of the neck facing. Sew and overlock
the shoulder seams of the facing. Overlock the outer edge of the facing.
Pin the facing on the garment neck opening rights sides together and sew
it to the garment at a distance of the seam allowance from the edge. (
Picture 3 )
 . .
Clip seam allowances at intervals of about 2cm/.75". Fingerpress the
seam open, understitch through the facing and the seam allowance. Iron
carefully. Sew and overlock the sleeve seams. Sew sleeves to the armscyes
of the garment.
 Turn
a seam allowance of 3-5cm/1.25-2" from the sleeve ends and from the hem.
Sew with double needle on the right side of the garment. (
Picture 4 ) Cut away the excess seam allowance from the wrong side
of the garment. Turn
a seam allowance of 3-5cm/1.25-2" from the sleeve ends and from the hem.
Sew with double needle on the right side of the garment. (
Picture 4 ) Cut away the excess seam allowance from the wrong side
of the garment.
Hint : You can sew a short top to be used as
underwear or sport garment using the pattern of outer front. Cut
Back piece to same length. Finish neck opening, armscyes and hem with
ribbings. Use the ease option of "minimum".
Nursing dress
Sew and overlock the joining seams of the front hem pieces. Turn the
seam allowances of the front top pieces in and sew according to the picture.
(
Picture 1 ) Place and baste front top pieces on top of each other
according to marks in the patterns.
Sew and overlock the joining seam of the front top and hem pieces. (
Picture 2 ). Iron.
Sew and overlock the joining seams of the back hem pieces. Leave the
CB seam unsewn for the time being. Sew the shoulder darts of the back
pieces and join the back top pieces to the back hem pieces. Iron. Overlock
the edges of the CB seam. Sew CB seam from hem to a distance of approximately
20cm/8" from the waist marks downwards (to the hip level). Baste the rest
of the CB seam. Iron the seam open. Fasten zipper to the top (= basted)
part of the CB seam. Unravel the basting stitches.(
Picture 3 ).
Place front and back pieces on top of each other, right sides together.
Sew and overlock the shoulder and the side seams. When sewing the shoulder
seams place the edges of the nursing openings on front piece side by side.
(
Picture 4 ).
Prepare the outer top as follows. Sew hemmings to the CB edges of the
outer back. Sew and overlock the side seams of the outer top. Sew hem
seam allowances of the top. (
Picture 5 ). Iron.
Iron interfacing to the wrong side of the neck facing. Sew shoulder
seams of the neck facing. Overlock the outer edge of the neck facing.
Iron.
Pin outer top piece on top of the inner top piece, matching neck openings
and armscyes. Position neck facing at the neck opening, right sides together.
Sew at distance of the seam allowance from edge. (
Picture 6 ). Sew understitching through the facing and the seam
allowances and turn the facing inside the garment.
 Fasten
facing with hand stitches to the zipper tapes and to the shoulder seams
at the wrong side of the garment. Leave the outer back pieces loose on
the inner back piece. Do not sew them to the CB seam. Fasten
facing with hand stitches to the zipper tapes and to the shoulder seams
at the wrong side of the garment. Leave the outer back pieces loose on
the inner back piece. Do not sew them to the CB seam.
If you sew long sleeves with flounce, sew and overlock the joining seam
of the flounce piece and the sleeve. Sew and overlock the sleeve seams
from cuff to armpit. (
Picture 7 ). Fasten sleeves to armscyes through outer and inner
tops.
|