|
PatternMaker Outerwear Garment Macros
Measurements
In the outwear garment macros following unisex measurements can
be chosen. You can, of course, also use your personal measurements in
the macros, as measurements tables or entering the measurements on top
of the default measurements. In the latter case you can choose any default
set of measurements as the basis (XS, S, M ...).
If you are going to sew garments to another person, choose the size according
to the subject's chest circumference measurement. It is recommended that
you in all cases check, if possible, the length of the sleeve and the
trousers legs. They may vary a lot and do not necessary correlate with
the chest circumference.
Centimeters
Measurements
|
XS
|
S
|
M
|
L
|
XL
|
2XL
|
3XL
|
4XL
|
|
Chest circumference
|
84,0
|
92,0
|
100,0
|
108,0
|
116,0
|
124,0
|
132,0
|
140,0
|
|
Hip circumference
|
86,0
|
94,0
|
102,0
|
110,0
|
118,0
|
126,0
|
134,0
|
142,0
|
|
Waist circumference
|
67,0
|
75,0
|
83,0
|
91,0
|
99,0
|
107,0
|
115,0
|
123,0
|
|
Waist height (women)
|
51,0
|
52,6
|
54,2
|
55,8
|
57,4
|
59
|
60,6
|
62,2
|
|
Back width
|
36,0
|
38,0
|
40,0
|
42,0
|
44,0
|
46,0
|
48,0
|
50,0
|
|
Back length
|
43,2
|
44,0
|
44,8
|
45,6
|
46,4
|
47,2
|
48,0
|
48,8
|
|
Neck circumference
|
37,0
|
39,0
|
41,0
|
43,0
|
45,0
|
47,0
|
49,0
|
51,0
|
|
Arn length
|
63,0
|
64,0
|
65,0
|
66,0
|
67,0
|
68,0
|
69,0
|
70,0
|
|
Pants outside length
|
103,5
|
106,5
|
109,5
|
112,5
|
115,5
|
118,5
|
121,5
|
124,5
|
|
Crotch height
|
26,5
|
27,5
|
28,5
|
29,5
|
30,5
|
31,5
|
32,5
|
33,5
|
|
Wrist circumference
|
16,0
|
16,8
|
17,6
|
18,4
|
19,2
|
20,0
|
20,8
|
21,6
|
Inches
Measurements
|
XS
|
S
|
M
|
L
|
XL
|
2XL
|
3XL
|
4XL
|
|
Chest circumference
|
33,1
|
36,2
|
39,4
|
42,5
|
45,7
|
48,8
|
52,0
|
55,1
|
|
Hip circumference
|
33,9
|
37,0
|
40,2
|
43,3
|
46,5
|
49,6
|
52,8
|
55,9
|
|
Waist circumference
|
26,4
|
29,5
|
32,7
|
35,8
|
39,0
|
42,1
|
45,3
|
48,4
|
|
Waist height (women)
|
20,1
|
20,7
|
21,3
|
22,0
|
22,6
|
23,2
|
23,9
|
24,5
|
|
Back width
|
14,2
|
15,0
|
15,7
|
16,5
|
17,3
|
18,1
|
18,9
|
19,7
|
|
Back length
|
17,0
|
17,3
|
17,6
|
18,0
|
18,3
|
18,6
|
18,9
|
19,2
|
|
Neck circumference
|
14,6
|
15,4
|
16,1
|
16,9
|
17,7
|
18,5
|
19,3
|
20,1
|
|
Arn length
|
24,8
|
25,2
|
25,6
|
26,0
|
26,4
|
26,8
|
27,2
|
27,6
|
|
Pants outside length
|
30,3
|
31,1
|
31,9
|
32,7
|
33,5
|
34,3
|
35,0
|
35,8
|
|
Crotch height
|
40,7
|
41,9
|
43,1
|
44,3
|
45,5
|
46,7
|
47,8
|
49,0
|
|
Wrist circumference
|
6,3
|
6,6
|
6,9
|
7,2
|
7,6
|
7,9
|
8,2
|
8,5
|
Sewing instructions
Here you get sewing instructions for a padded outwear jacket for women
or men. At the end of these instructions there are some pictures of sewing
the trousers. For more information, please refer to other sewing instruction
pages on this site, general sewing instructions
and sewing instructions for ladies' and men's
garments.
 As
the coat will be lined, the seams do not need to be overlocked. As
the coat will be lined, the seams do not need to be overlocked.
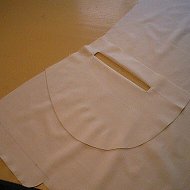
Back piece
Cut the back piece at halfway of the armscye, add seam allowances
to both edges. Cut a strip of fabric, 5 cm (2 in) wide and as long as
the back piece is wide (+ seam allowances). Fold the strip lengthwise
into two wrong side inside and sandwich it as a decoration between the
cut edges of the back piece. Topstitch the seam and iron. (Picture
1)
 Front
piece Front
piece
Sew buttonhole pockets to the front pieces according to general
sewing instructions (picture 2).
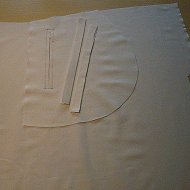
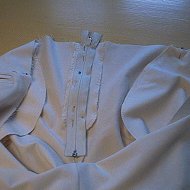
Hood and collar
Sew the top/back seams of the hood and the hood lining. Clip seam
allowances at the curved area. Sew buttonholes at a distance of about
1.5 cm (3/4 in) from the front edges of the hood lining according to the
picture (picture 3, arrow). Sew the hood and the lining together
right side against right side along the front edges and around the front
overlap, stop at the CF mark. Clip the seam allowance at this place. Leave
the rest of the hood neck raw and baste or pin.
Turn the hood right side out and iron. Edgestitch the front edges and
around the front overlap. Sew at the front edge of the hood a 2 cm ( 3/4
in) wide casing for a draw band. Sew two buttonholes to the front edge
through all thicknesses, the first one 1 cm ( 2/5 in) down from the buttonhole
sewn to the front edge of the lining and another one 4 cm (5/8 in) downwards
from this (picture 4, arrows).
Shell and sleeves
Sew the shoulder seams of the shell. Attach sleeves to armscyes. Sew
the sleeve and the side seams continuously.
Sew the top piece of the collar to the coat's neck. Sandwich the hood
neck between the collar and the coat's neck. Beware of not sewing the
front overlaps of the hood to the seam (picture 5, arrows). Cut
clips to the curved seam allowances.
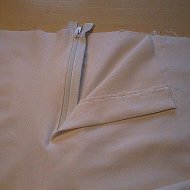
Zipper
Sew the bands of the zipper right sides against right sides to the front
edges of the coat and the collar facing away from the front edges. Turn
the top ends of the zipper bands downwards (picture 6, arrow).
Lining
Sew the shoulder seams of the lining. Sew the lining sleeves to the
armscyes of the lining. Sew the sleeve and side seams of the lining continuously.
 Sew the under collar to the neck of the lining. Cut clips at the curved
seam allowances. Sew vertical buttonholes to the hem of the lining at
a distance of 1.5 cm (3/4 in) from the hem and at a distance of 12 cm
(4 3/4in) from the front edges.
Sew the under collar to the neck of the lining. Cut clips at the curved
seam allowances. Sew vertical buttonholes to the hem of the lining at
a distance of 1.5 cm (3/4 in) from the hem and at a distance of 12 cm
(4 3/4in) from the front edges.
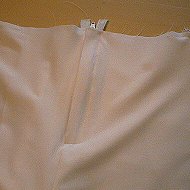
Joining the shell and the lining
Sew the shell and the lining together right side against right side
along front edges, collar edge and hem. Sew both sides separately starting
from the center of the collar (picture 7). Sew the front edges
along the zipper stitch line. Leave an opening at the hem for turning
the coat right side out.
Clip curved seam allowances. Trim away the front corners of the hem.
Sleeve cuffs
Fold the ends of the sleeves and the linings of the sleeves in the
way they will be in the finished garment. Grab the folded seam allowances
from the wrong side of the garment at the sleeve seam through the opening
at the hem and draw the wrong sides of the sleeves out. You can then sew
the sleeve ends together right side against right side (picture 8).
Sew the neck seams of the shell and the lining together at a short distance.
 Turn
the coat right side out and close the opening at the hem. Open seam allowances
well and iron. Edgestitch the collar and the front edges at the side of
the zipper. Sew to the hem a 2 cm (3/4 in) wide casing for a draw band
through all thicknesses. Sew two vertical buttonholes for the draw strings
through all thicknesses at a distance of 2 cm (3/4 in) from the front
edges and 6 cm (2 3/8in) from each other (picture 9). Turn
the coat right side out and close the opening at the hem. Open seam allowances
well and iron. Edgestitch the collar and the front edges at the side of
the zipper. Sew to the hem a 2 cm (3/4 in) wide casing for a draw band
through all thicknesses. Sew two vertical buttonholes for the draw strings
through all thicknesses at a distance of 2 cm (3/4 in) from the front
edges and 6 cm (2 3/8in) from each other (picture 9).
 Zipper
cover Zipper
cover
Make the zipper cover sewing one zipper cover piece cut of the main
fabric to another zipper cover piece cut of the padded lining fabric right
side against right side. Leave the straight edge raw. Turn the zipper
cover right side out and edgestitch. Sew the cover inside up and facing
away from the zipper on the plant line marked on the patterns. Trim seam
allowance. Turn the cover to its right position and topstitch (picture
10).
Draw bands
Sew 0.7 cm (1/4 in) wide band from the main fabric for the hood and
the hem draw bands (pictures 11, 12 and 13). Replaced most
part of the hem draw band with elastic. Feed the draw strings into the
casings and through the buttonholes according to the pictures. Put stoppers
at the ends of the draw bands and tighten them a bit.
Sew velcro pieces at the edges of the hood and the zipper cover.
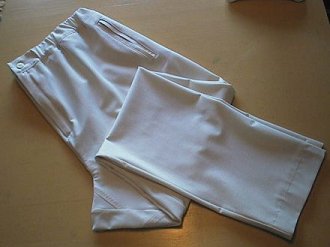
Trousers
For sewing instruction please refer to the general
sewing instructions and sewing instructions for ladies'
and men's garments.

|
