|
Leena's
Drafting Lessons
Drafting Patterns For a Child's Jacket
 Metric
conversion table Metric
conversion table
 This lesson instructs you to draft a jacket for chidren using children's
shirt macro to start with. The pattern drafting method used is the Scandinavian
one.
This lesson instructs you to draft a jacket for chidren using children's
shirt macro to start with. The pattern drafting method used is the Scandinavian
one.
Start running the shirt macro for children. To see drawings
of the garments included in the children's macro,
click here
. To get instructions of how to order this macro collection,
click here
.
The technique described here to draft the collar is a simple
one which can be used for children's garments. I would, however, not recommend
darfting collar pattern for adult garments using this technique.
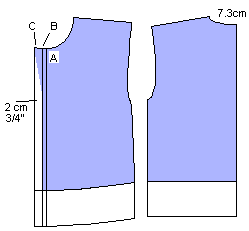
Draft jacket pattenrs on top of the shirt patterns according
to above drawing. Please note that the jacket front pattern extends to
the fold line of the shirt button extension, marked with letter B in the
drawing. Letter A has been used to mark center front and C to mark the
tip of the jacket lapel. In these instructions the distance between B
and C is 2 cm (0.75 in) but you can set this to anything you like better.
Point D is to mark the place where the lapel starts, it is up to you where
to place it.
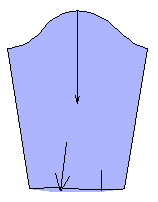
Straighten the sleeve cuff edge as done in the drawing.
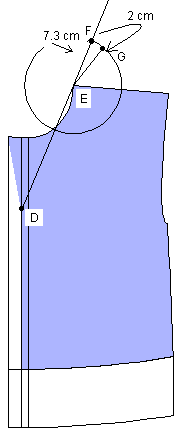
Measure the length of the back neck (Points / Set/Measure
dist.). In this example the measurement is 7.3 cm (ca 3 in).
Draw a line from point D to point E (Draw polygon / Line)
and continue from there in the same direction (Draw polygon / Tangent
line) as in the drawing. Measure on this line 7.3 cm (= the measured length
of back neck) from E to F. You can use a circle as compasses (Draw circle).
Pivot line E-F 2 cm clockwise (constant) (Edit rotate).
Square out 6 cm from G to get point J.Distance G-H-J is
the width of the collar of which G-H (2 cm) is the back collar standand
H-J (4 cm) is the isible part of the collar.
Then shape the rest of the collar as you want to.

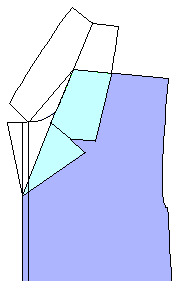
If you want to see how the shape of the lapel and the collar
will look when ready, cut the jacket shell and the collar with line D-E-F.
Then mirror the pieces on top of the jacket front. Refer to the rawing
to the right.
If you do not like the shape, move the vertices of the mirrored lapel
and/or collar pieces and mirror the altered pieces back to their original
position and join the pieces to get new undivided front and collar patterns.
You can read detailed instructions of how to do this in
Excercise 23 in the
Design Tutorial
of this website.
Sewing instructions are also included on this web site.
To view them
click here
.
| 