|
Tutorial
Quick guide
| User's Manual |Grading
In this tutorial PatternMaker basics have not been touched. We presume
that you have gone through the information given in the User's Manual
which you have gotten with the program delivery.
All exercises in this tutorial are real-life design cases which can
be used with or without PatterMaker. So, doing (or viewing) these exercises
you will learn something about designing garments, too. After having done
the exercises you will be able to apply your new skills to make your own
designs.
For pedagocic reasons the exercises in this tutorial have been grouped
according to PatternMaker editing commands. There are, of course, many
commands which are used in each exercise, but in all exercises there is
one command in which we want you to pay special attention to.
There is no special order in which you should do the exercises. You
can pick any of them to start according to your personal preferences.
Use the links below to move to a certain exercise in this document.
What are the macros?
Each macro is a little computer program that draws a particular pattern
based on measurements you give it. These patterns are made up of polygon
objects, which can be modified like any other objects in your drawing.
PatternMaker macros were programmed in Finland and they are based on
the Scandinavian Pattern drafting method. They have been thoroughly tested
in commercial and school use
There is a very important benefit of the Scandinavian pattern drafting
system. All the measurements you have to take are unambiguous and easy
to take. There is no need to take cross-measurements from shoulder tip
to CF or CB, which are quite difficult to take. Front and back circumferences
are measured as one, and bust, waist, abdomen or hip circumference are
not measured separately at front and at back. The length of the side seam
is not measured.
The PatternMaker macros have been programmed by a pattern drafting professional
i.e. an end user of the program like you. So she was able, when writing
the macros, to test all the options of the macros by sewing the garments
for herself.
A macro is a small computer program
A macro is a small computer program, which you run with your PatternMaker
program. After you choose the macro command from the main menu or by clicking
on the macro icon, the program asks you to choose the garment. Then you
are asked to give some information: choose options and give measurements.
Usually you also choose one of three ease options: minimum, normal or
maximum. Please refer to
 the sewing instructions for the
macros
to learn about the ease amount of each ease category. After you have answered
all the questions, the program runs the macro and you get all the pattern
pieces you need for a fashion garment – and everything has been drafted
according to the given measurements.
Tailored garments according to given measurements
With the macros you draft patterns for tailored garments according to
given measurements. If the measurements have been taken correctly, you
usually get faultless patterns for the garment you have chosen. Difficulties
may rise with some unusual body shapes – like strongly asymmetrical
bodies – as they would with any pattern drafting method. To make
sure that you have taken the measurements correctly, it is strongly recommended
that you sew a test garment (muslin) with the patterns for the basic bodice
(sloper). It should fit very tightly on you, like a second skin. If the
test garment is all right, you can be sure that all PatternMaker macro
garments fit well when the tested measurements are used.
Ladies’s basic macros
The Ladies' basic macros are included in the program. With these macros
you can draft patterns for an entire wardrobe to given measurements. You
do not need to know anything about pattern drafting to do this. The basic
macros contain simple basic garments, which are good for most figure types.
If you want to see what other macro collections there are, plase go to the PatternMaker Website http://www.patternmakerusa.com
.
This is how to run a macro
Try the macros first with the default measurements given
(= Scandinavian size 42) to get familiar with the kinds of garments you
can sew with the PatternMaker macros. If you want need to get women's
standard measurements for other sizes,  click here
.
Choose the command File/Macro from the main menu. You can do this in
three ways: either you simultaneously press the <Alt> key and the
underlined letter of the command (<Alt>F then M) or you pull down
the File menu and then choose the command by clicking on it with the left
button of the mouse (M1). Or you can click (M1) on the Macro icon on the
left side of the screen. It’s the icon that says “mac.”
When you get the dialog box depicted above, choose the
macro you want to try by double clicking on its name with the left mouse
button (M1) or click on its name once and then click <OK>.
The program asks different things for different garments:
single or double breasted, with or without sleeve, amount of ease etc.
Choose the options by double clicking on the option or click on the option
once and then click <OK>.
Note: You have to choose an option in each dialog box. If you
click <OK> or type <Enter> without choosing any option,
the macro stops.
Next, a dialog box for the measurements is opened. Instructions for
taking the measurements are given later in this tutorial.
Move from field to field in the dialog box with <TAB>
key, or by clicking the mouse (M1).
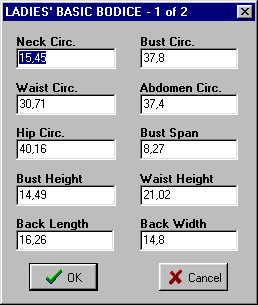
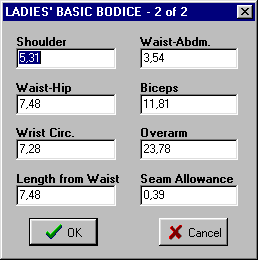
After having answered to all the questions and given the measurements,
the program drafts all pattern pieces for the selected garment on the
screen. Wait until the hourglass cursor changes back to an arrow. If you
cannot see the patterns at all or you see only part of them, type the
<END> key on your keyboard. Then the screen is zoomed so that you
can see the entire pattern.
Note: When you want to try another macro, clear the
screen by choosing the command “File/New” from the main menu.
Click the word “File” in the menu bar at the top of the screen
with M1, and then the word “New” with M1. Usually, you will
answer “No” when the program askes whether you want to save
the file or not.
Adding seam allowances
If you want to add seam allowances to the patterns, type the wanted
width of seam allowance to its place in the measurements dialog box. If
you want your patterns to have no seam allowance, type "0" (zero)
as its value. After having ran the macro you can use the command Draw/Offset,
from the Draw menu. After choosing the command, select all the pieces
one by one with M1 and accept the selection with M2.
Using the command Draw/Seam Allowance you can add a seam allowance of
varying width to different edges of the pattern. Please refer to the User’s
manual to learn more about this.
Layers
In the black drawing area there are many layers superimposed one over
another. You can use the layers to organize your pattern, for instance
by placing the different sizes of the garment (36, 38, 40 …) on different
layers or different garments for one customer (skirt, jacket, blouse …)
on different layers. You can change the settings of the layers by clicking
the layer box in the status bar (Layer 0) with M1. You can name the layers
whatever you want: Click in the box for a layer’s name with M1 and
write the new name on top of the old one.
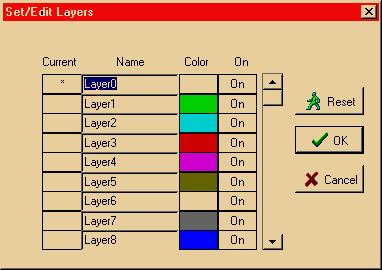
One of the layers is active at a time. Drawing commands and the macros
produce objects on the layer which is active. Activate a layer by clicking
with M1 in its “Current” column.
The layers can be visible or hidden. To hide a layer, click with M1
in the “On” column to change it to Off. The printing command
Print All prints the objects all the layers which are On. So, if you want
to print the items on one layer only, turn the other layers off.
HINT : When you make alterations to the
fashion patterns or basic bodice (sloper) which you have drawn using
the macros, run the macro twice, first on layer 0 and then on layer
1. Then hide layer 0. Make the alterations to the patterns on layer
1. From time to time you can display layer 0 and compare the changed
patterns with the original ones. This is a good way to check that you
have made all the changes you intended to do.
Drawing objects
Exercise 1: drafting a collar
In this exercise you learn to draft a collar in three different ways:
1) using a frame, 2) typing the points of the collar from keyboard and
3) drafting the collar using the Grid points
First make a plan as in the picture below. According to the plan we
are going to draft a collar which is 6 cm high at the CB (A-J) and which
has been curved at the neck 3 cm (from point J downwards). The collar
is 6 cm high also in the CF (D-E) and its point (D) extends 5 cm to the
left from the CF point. Let's assume that the measured neck circumference
of the garment is 40 cm. Then the half length of the collar is 20 cm.
Look at the collar in the picture to notice how it is composed of lines
and arcs. At the top edge of the collar there is a combination of an arc
(B-C-D) and a line (A-B). In order make the arc and the line merge into
one another smoothly, point A has to be on a straight line with the starting
point of the arc (B) and the corner point of the arc (C).
At the bottom edge of the collar there is a combination of two arcs
(J-H-G and G-F-E). In order to make these two arcs merge into one another
smoothly, the corner point (H) and the end point (G) of the first arc
have to be on a straight line with the corner point of the other arc (F).
If you need to know more about arcs, please refer to PatternMaker User's
Manual.
Method 1) Drafting the collar in a frame:
Draw a rectangle 20 cm wide and 9 cm high (Draw /Rectangle): Choose
the command, click somewhere on the screen with M1 (this will be the left
corner of the rectangle E) and type the coordinates of the right top corner
of the rectangle (A) from the keyboard: "@20,9" <Enter>.
The "@" sign means that the coordinates of the latter point
are given relative to the given location of the first point (E).
Then draw another rectangle starting from the bottom left corner of
the first rectangle using snap to end point <CtrlF3>, M1. Type as
the relative coordinates of its top right corner (C) "@5,9"
<Enter>.
Draw two additional rectangles of size 5x9 cm. The first one starts
at the right bottom corner of the second rectangle (F) and the other at
the right bottom corner of rectangle F.
For the collar tip (D), draw a rectangle of size 5x6 cm starting from
point E and going to the left: select the starting point of the rectangle
at point D, M1 and type the coordinates of the opposite corner of the
rectangle (D) from keyboard: "@-5,6" <Enter>.
Now you can draw the collar following the points of the frame (Draw
/Poly, CtrlF3). Please note that the points C, F and H are corner points
of an arc. When you come to a corner point, draw the point before the
corner point in the usual way and then change the polygon tool to the
X arc mode(M2 … Arc(x)). When you have finished the arc, remember
to change the polygon tool back to the line mode (M2 … Line). If
you make a mistake, you can undo it and try again (M2 ... Undo last point).
If you find this difficult, you can draw the collar first with all straight
lines and change the arc corner points later to round points (Point /Round
vertex).
Please note that there is not a point already drawn in the place where
you have to draw point G. To place this point, use snap to intersection,
CtrlF7. Change your snap mode back to snap to end point (CtrlF3) after
you draw this point, because snap to intersection will slow your computer
down.
Method 2) Drafting the collar by typing points in from the keyboard
Here, you are entering exactly the same points as with Method 1), but
without the frame to guide you. Select the starting point of the collar
(A) anywhere on the screen, M1 and type other points from the keyboard
as follows:
point B: @-5,0 <Enter>, change the polygon tool to arc mode,
M2 … Arc(x)
point C: @-10,0 <Enter>
point D: @-10,-3 <Enter>, change the polygon tool back to line
mode, M2 … Line
point E: @5,-6 <Enter>, change to arc mode, M2 … Arc(x)
point F: @5,0 <Enter>
point G: @5,1.5 <Enter>
point H: @5,1.5 <Enter>
point J: @ 5,0 <Enter>, finish, M2 … Done (closed)
Method 3) Drafting the collar along the grid points of the screen
Set the grid spacing to 1 cm using the command Misc /Grid. Activate
snap to grid typing CtrlF2. You show and hide the grid by typing F4.
Select the starting point of the collar (A) anywhere on the screen,
M1. Notice that as you are using snap to grid CtrlF2, the cursor moves
from grid point to grid point. Select the rest of the points with mouse
(M1) going along the grid points as follows:
point B: count 5 points from point A to the left and click with mouse
(M1), then change to arc mode, M2 … Arc(x)
point C: count 10 points from point B to the left, M1
point D: count 10 points to the left and 3 points down, M1, change back
to line mode, M2 … Line
point E: count 5 points to the right and 6 points down, M1, change to
arc mode, M2 … Arc(x)
point F: count 5 points to the right, M1
point G: count 5 points to the right and 1.5 points up (please notice
that as we are using a grid 1x1 cm, there isn't any grid point here.
Therefore, deactivate snap to grid, CtrlF1, select the point by eye
and activate snap to grid again, CtrlF2)
point H: count 5 points to the right and 1.5 points up
point J: count 5 points to the right, M1, and finish, M2 … Done
(closed)
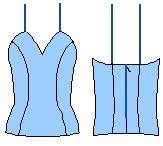
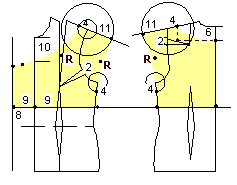
Exercise 2: Patters for corset from basic bodice patterns
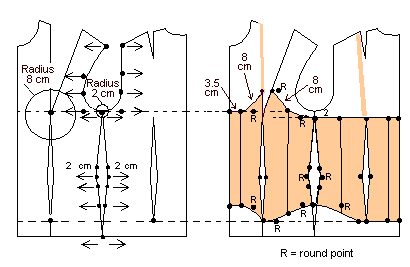
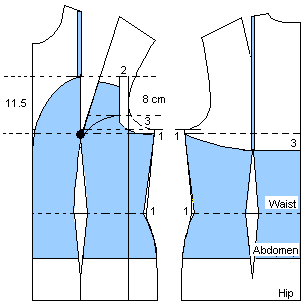
1. Run the basic bodice macro (File /Macro, Lbodice.mac).
Decrease 2 cm of ease on the front and the back pieces. (The whole circumference
is thus decreased by 8 cm i.e. the ease that has originally been added
to the body measurements in the basic bodice patterns). Decrease the ease
by moving points (Point /Move vertex). Choose all the vertices that are
to be moved in the same direction at one time, M1, M1, M1 … accept,
M2. Give as the base point of the move "0,0" from keyboard and
as the destination point of the move "2,0" (moving to the right)
or "-2,0" (moving to the left) <Enter>. Move the back
piece and its waist dart to touch the front piece at the armpit vertex
(Edit/Move). Use snap to end point (CtrlF3) to be exact.
Draw a circle with 8 cm radius and center point at the bust apex, and
a circle with 2 cm radius and center point at the joint armpit vertex
of the front and the back pieces (Draw /Circle, CtrlF3). Choose the center
point of the circles and type the radius from keyboard "8" or
"2" <Enter>.
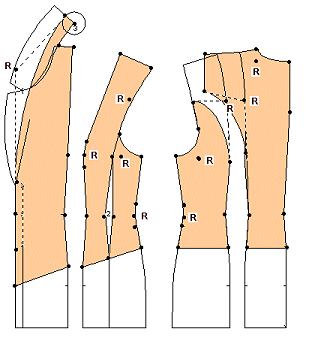
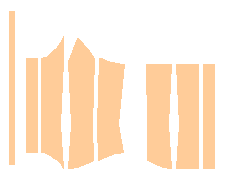
2. Draw the corset patterns according to the picture along the existing
vertices (Draw /Poly, CtrlF3). Round points (corner points of an arc)
have been marked with "R" in the picture. Draw the shoulder
straps (Draw /Line or Draw /Poly). Erase the guide circles.
Exercise 3: Drafting patterns for hood
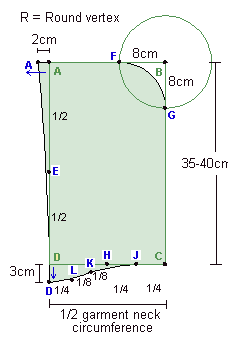 1.
Measure the neck circumference of the garment (not your neck circumference).
Divide it by 2. 1.
Measure the neck circumference of the garment (not your neck circumference).
Divide it by 2.
2. Draw a rectangle with size 1/2 of the garment neck circumference
x 35-40 cm = points A-B-C-D
3. Draw a circle at the upper right corner of the rectangle with radius
8 cm
4. Add points as follows:
- midway between points A and D = point E
- 8 cm from point B to the left = point F
- 8 cm from point B downwards = point G
- midway between points C-D = point H, use snap to mid point (CtrlF2)
- midway between points C-H = point J
- midway between points D-K = point L
- midway between points H-L = point K
5. Move point A 2 cm to the left. Move points D and L 3 cm down
- move point K 1.5 cm down
6. Change points B, E, H and L to round points (Point/Round Vertex)
Copying objects
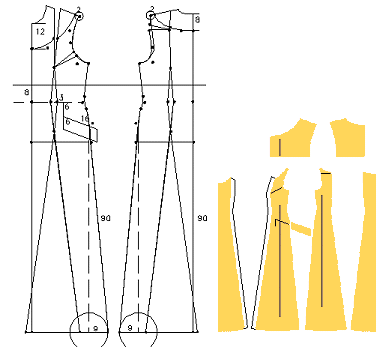
Exercise 4: A long evening skirt
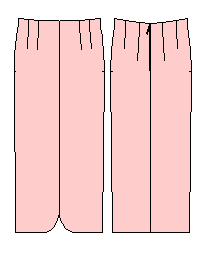
1. Run the skirt macro, giving as the length of the skirt 90 cm (File
Macro, Lskirt.mac). Remove the lining and the waist band (Edit /Erase).
Draw guide lines at the front and back waist of the skirt (Draw /Line)
as in the picture i.e. three lines per piece and one line for the zipper
extension
2. Move the lines 3 cm up (Edit /Move): Choose the command, select the
lines one by one, M1, M1, M1 … and accept the selection, M2. Type
as the starting point of the move "0,0" <Enter>, and as
the destination point of the move "0,3" <Enter>.
3. Using the vertices of the waist and the guide lines draw the pattern
pieces for the raised waist (Draw Poly, Ctrl F3).
4. To draw waist facings, copy the pattern pieces for the raised waist
above the skirt pieces (Edit /Copy) Move the pieces of the facings adjacent
to each other (Edit /Move, CtrlF3). Choose the command, then select the
piece to be moved , M1, accept M2. Give as the starting point of the move
one of the edge points of the piece, M1 and as the destination point of
the move the edge point of the other piece where you want the pieces to
meet, M1. Join the facing pieces (Edit /Join). After choosing the command
select one of the pieces to be joined, M1, accept M2. Then select the
piece next to it, M1, M2. Continue joining pieces one at a time, selecting
the piece which you just joined, M1, M2 and then the piece the be joined
with it, M1, M2.
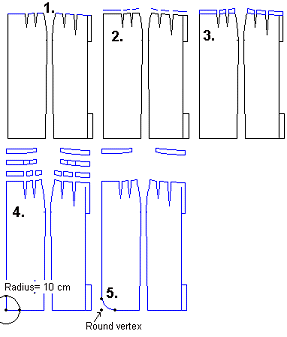
5. Join skirt pieces and the pieces for the raised waist. To round the
corner of the center front pieces at the hem, add vertices on the CF line
at a distance of 10 cm from the hem and at the hem line at a distance
of 10 cm from CF; use snap to measured distance CtrlF9 or draw guide circles
with a radius of 10 cm. Finally, change the center front point of the
hem to round point (Point /Round vertex).
Working with points
Exercise 5: Drafting patterns for an overall
1. a) First make preparations for the top part of the overall and run
the basic bodice macro (File /Macro, Lbodice.mac). Erase all other pattern
pieces but the front and the back pieces. Do not erase the back dart piece.
Use command Edit /Erase, select all the pieces to be erased one by one,
M1, M1, M1…, accept and execute the command with M2.
b) Draw a line to cut the pieces at the waist level as in the picture
(Draw /Line, CtrlF3). Start the line at the CF waist point and end at
the CB waist point. Then cut the pieces with the line (Edit /Cut): Choose
the command, select the CF piece, M1, accept M2, then select the cutting
line, M1, accept and execute the command M2. Cut the same way also the
front side piece and the back piece as well as the back dart piece. Erase
the cutting lines and all pieces under the waist level (Edit /Erase).
Select all the pieces to be erased one by one, M1, M1, M1... , accept
the selection and execute the command with M2.
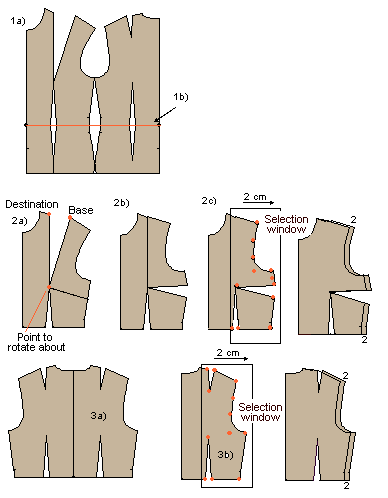
2 a) Start designing the front pieces. Draw a cutting line on the front
side piece as in the picture (Draw /Line), starting from the bust apex
(CtrlF3) and ending outside the side seam. Cut the front side piece with
the line (Edit /Cut). Choose the command select the piece to be cut (=
the front side piece), M1, accept M2 and then the piece to cut with (=
cutting line), M1, accept M2. Erase the cutting line (Edit /Erase).
b) Rotate the top part of the front side piece to close the bust/shoulder
dart and to open it to the side seam (Edit /Rotate). Choose the command,
select the piece to be rotated (= top piece of the front side piece),
M1, accept M2. Select the point to rotate about (it is marked in the picture)
(= bust apex), M1, then select the base point of the rotation (also marked
in the picture, M1 and finally the destination point of the rotation,
M1.
c) Join the front pieces together into one piece (Edit /Join): Choose
the command, select the CF piece, M1, accept M2, then select the top side
piece, M1, accept M2. Finally select the piece you joined, M1, accept
M2 and the remaining bottom part of the side piece, M1, accept M2. Add
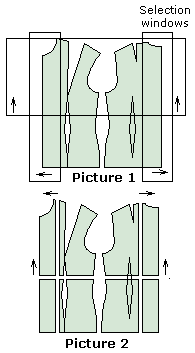
ease to the front piece by moving the vertices as in the picture i.e.
2 cm to the right. Choose command Point /Move vertex. Select the points
to be moved with a selection window, it is shown in the picture. The selection
window is activated by the selection window icon or typing "W"
from the keyboard after you have chosen the move vertex command. Choose
the left top corner of the selection window with M1, move the mouse and
point the right bottom corner of the selection window with M1 (refer to
the picture). Accept the selection with M2. Then type as the base point
of the move "0,0" <Enter> and as the destination point
of the move "2,0" <Enter>.
3 a) Make a mirror copy of the back piece so it faces in the same direction
as the pants back piece (Edit /Mirror). Choose the command, select the
piece to be mirrored (= back piece), M1, accept M2. Then give, as the
top point of the line to be reflected across, the CB neck point, M1 and
as the bottom point of the line to be reflected against, M1. Erase the
original back piece (Edit /Erase). b) In order to add ease to the back
piece, move the points marked in the picture 2 cm to the right the same
way you moved the points in the front piece (Point /Move vertex). Use
a selection window as illustrated in the picture.
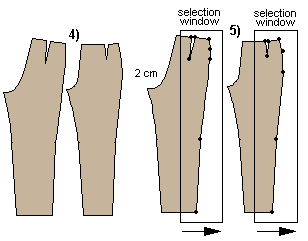
4. Now start designing the pants part of the overall. Run the pants
macro (File /Macro, Lpants.mac). Erase center lines, pocket mouth line,
waist band and the zipper extension (Edit /Erase).
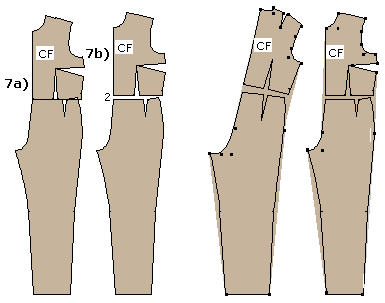
5. Add to the front and the back pants 2 cm ease in the same way you
did in the top parts (Point /Move vertex). Use a selection window illustrated
in the picture.
6. a) Move the top back piece to touch the pants' back piece, so that
their CB waist points lie on top of each other (Edit /Move, CtrlF3). Choose
the command, select the piece to be moved (= back top piece), M1, accept
M2. Choose as the base point of the move the CB waist vertex of the top,
M1 and as the destination of the move the CB waist point of the back pant,
M1.
b) Rotate the top piece so that its waist is on the back pants' waist
(Edit /Rotate, CtrlF3). After having chosen the command select the piece
to be rotated (the top piece), M1, accept M2. Choose the CB waist vertex
of the top piece as the center point of the rotation (the point to be
rotated about), M1, the waist side vertex of the top as the base point
of the rotation, M1 and the the waist side vertex of the pant as the destination
of the rotation, M1. These points are marked in the picture 6a.
c) To add vertical ease at the waist of the overall, move the back top
piece 2 cm up (Edit /Move). Choose the command, select the piece to be
moved (= back top), M1 and accept, M2. Give as the base point of the move
from keyboard "0,0" <Enter> and as the destination of
the move "0,2" <Enter>.
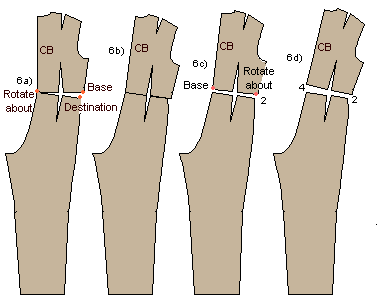
d) Rotate the back top so that you get an additional vertical ease at
the CB waist (Edit /Rotate). After having chosen the command select the
piece to be rotated (= back top), M1 and accept, M2. Give the side vertex
of the top waist as the center point of the rotation, M1 and the CB vertex
of the top waist as the base point of the rotation, and type the distance
to be rotated from keyboard "-2" (the distance is a negative
number because the rotation is to be done clockwise) <Enter>. The
points are marked in the picture 6c
7. a) Now move the front top piece so that it touches the front pant
at waist, the CF vertexes lie on top of each other (Edit /Move, CtrlF3).
Choose the command, select the piece to be moved (= the front top), M1,
accept M2. Give as the base point of the move the CF waist vertex of the
top, M1 and as the destination of the move the CF waist vertex of the
front pant, M1.
b) Add 2 cm vertical ease at the waist. Move the front piece up by this
amount (You do not need to select the command as it already is active).
Select the front top, M1, accept M2. Type as the base point of the move
from the keyboard "0,0" <Enter> and as the destination
point of the move "0,2" <Enter>.
8. Finally, draw the overall following the existing points (Draw /Poly,
CtrlF3). Show vertices by typing F5. Do not go through the waist vertices.
Go directly from the hip point to the armpit point (back) and from the
hip point to the bust dart point (front). Please notice that there are
arcs and lines in the patterns. When you arrive at a point where an arc
begins, open the polygon menu with M2, and choose from the options (Arc(x).
After having given the points for the arc (start, corner, end) - and if
there is not another arc after the first one, change the polygon tool
back to the line mode (M2 … Line). If you find this difficult, you
can draft the patterns with all straight lines (= without changing to
arc mode) and change the arc corner points afterwards to Round points
with Point /Round vertex.
After you have drafted the front and the back pieces of the overall,
erase all the original pieces (Edit/Erase). Draw grain lines on the pieces
(Draw /Line, CtrlF5).
Draw a collar for the overall if you want one. You can use the collars
macro. Before drafting the collar, make the neck opening of the overall
1 cm bigger in all directions (Point /Move vertex). This exercise is based
on the patterns of the basic sloper and it does not have enough ease at
neck for a real garment pattern. After making the neck opening bigger,
measure its length at front and at back (Point /Set/Meas.dist) and multiply
the result by 2 to get the whole neck circumference. You will use this
measurement in the collars macro.
In a real designing situation you would not have removed the sleeves
at the beginning. Please notice that if you want the overall to have sleeves
you have to make the armscyes bigger, too. You have to lower the armscye
of the bodice and broaden the sleeve at the armpit by the same amount.
This makes the sleeve larger at the armscye.
Alternatively you can use another macro for the top of the overall -
e.g. the blouse macro or the jacket macro. These macros already have the
needed ease at the neck opening and at the armscyes and the sleeves. Using
these macros, you need to add ease only to the pants part of the overall.
Exercise 6: Jacket with a side panel
1. Run the jacket macro (File /Macro, Ljacket.mac). Move the pieces
so that they touch each other at hem (Edit /Move, CtrlF3). a) Draw vertical
lines starting at the vertices on the armscye lines as in the picture
and ending outside (down) from hem (Draw /Line). (
Picture 1a ) Use snap to end point (CtrlF3) to grab the armscye
vertices and then snap to ortho (CtrlF5) to draw vertical lines.
2. Draw a polygon around the area between the side seams of the front
and the back piece (Draw /Poly, CtrlF3). (
Picture 1b ) Go along the existing vertices and use snap to end
point (CtrlF3). At the waist of the side seam there are three vertices;
the center one is a round vertex. You need not draw all these vertices;
just draw one (line) point at the center vertex as in the picture.
In the same way, draw a polygon around the back waist dart (Draw /Poly,
CtrlF3). (
Picture 1c )
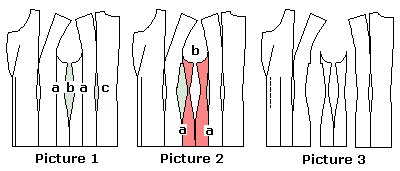
3. Move the polygons horizontally so that their new positions are on
the lines that you drew down from the armscyes (Edit /Move, CtrlF3). (
Picture 2a ) Choose the Move command, select the polygon drawn
between the side seams, M1, accept M2. Give as the base point of the move
the joint hem point of the front and the back piece (CtrlF3), M1, and
as the destination point of the move the intersection (CtrlF7) of the
vertical line and hem (CtrlF7), M1. Move the other help polygon similarly,
now to the line drawn down from the back armscye. The base point of the
move is now the intersection (CtrlF7) of the line down from the back waist
dart with the hem line, and the destination of the move is the intersection
of the line drawn down from the back armscye with the hem line.
4. Draw the new shapes of the front, back and side pieces following
the existing points (Draw /Poly, CtrlF3). Draw the front center and the
front side pieces as two separate pieces. Draw the back piece as one piece
with a shoulder dart. Draw the side panel in one piece. (
Picture 2b and picture 3 ).
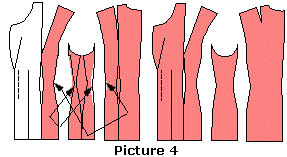
5. The shapes of the pieces are not quite satisfactory: The back piece
does not curve enough at the waist compared with the front piece. The
side panel is somewhat distorted. Therefore, move the waist vertices of
the pieces as shown in the picture: the waist vertices of the front side
and the back pieces (simultaneously) to the right and the waist vertices
of the side panel (simultaneously) to the left (Point /Move vertex). You
can do this by eye. First use the snap to end point (CtrlF3) to select
the vertices to be moved and then snap to ortho (CtrlF5) to move the vertices
horizontally. When moving the points in this way "in pairs"
the move of the points does not change the waist circumference of the
garment. (
Picture 4 )
Draw a cutting line on the front side piece at the top hip (abdomen)
level (Draw/Line, CtrlF3, CtrlF5). The line must extend over both edges
of the piece. (
Picture 5 )
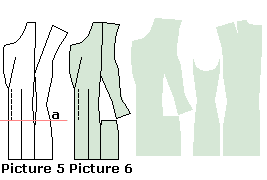
Cut the side piece with the line (Edit /Cut). Choose the command, first
choose the object to be cut (= the side panel), M1, accept M2 and then
the object to cut with (= the cutting line), M1, accept M2. Erase the
cutting line (Edit /Erase). Rotate the topmost piece of the front side
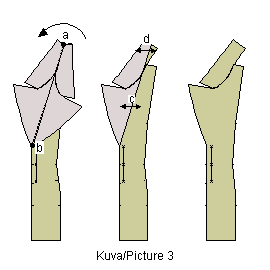
pieces so that the shoulder dart is closed (Edit /Rotate, CtrlF3). (
Picture 6 ) In this kind of a jacket the pocket is positioned on
this cutting line. After you have sewn the front waist dart, close the
cutting line temporarily with zigzag stitches. Iron a strip of interfacing
to its wrong side. When fastening the pocket you will cut the pocket mouth
along this line. If you are sewing a patch pocket, position it so that
the cutting line is hidden under the pocket.
Cutting objects
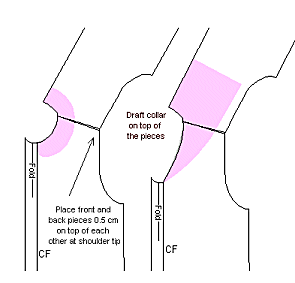
Exercise 7: Making a collar wider
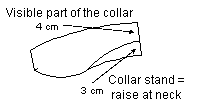
In order to make the collar wider, you also have to lengthen
the outer edge of the collar. Otherwise it does not have enough space
to lie flat on the back piece at the neck. Tailored collar in the PatternMaker
macros is 7 cm wide. The raise at the neck is 3 cm and the visible part
of the collar is 4 cm.
The aim of this exercise is to broaden the collar with 3 cm. When this
has been done, the visible part of the collar will be 7 cm.
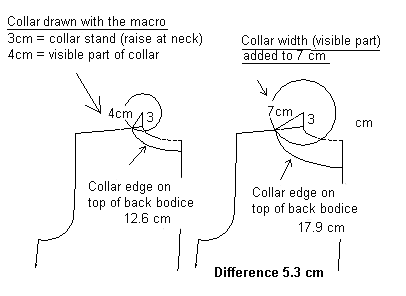
As seen in the picture, the new length of the outer edge of the collar
at back is 17.9 cm which is 5.3 cm longer than the outer edge of the original
collar. So you have to lengthen the outer edge of the collar with 5.3
cm.
To draw the above picture:
1. draw the collar stand from the neck shoulder point 3 cm upwards
2. draw the original height of the visible part of the collar from top
edge of the collar stand to the shoulder line (use guide circle)
3. draw the new height of the visible part of the collar from top edge
of the collar stand to the shoulder line
4. draw arcs starting from the intersection of the visible part of the
collar and the shoulder line to the center back seam
5. Measure the lengths of the arcs i.e. collar back edges in both situation
(Point/Set/Meas.dist)
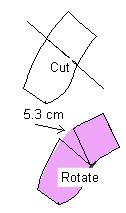
Draw a cutting line across the collar (Draw/Line).
Cut the collar with the line (Edit/Cut). Select the collar, M1, accept
M2, then select the line, M1, accept M2. Then rotate one cut piece of
the collar in order to add length to the collar edge. Select the piece
to be rotated (in the picture it is the right side piece), M1, accept
M2. Choose the point to rotate about with M1, (marked in the picture),
the starting (base) point of the rotation (also marked in the picture),
and finally type -5.3 from keyboard. Draw the new shape of the collar
along the existing vertices of the collar pieces (Draw/Poly).
If needed, you can correct the shape of the new collar by moving points
manually (Point/Move vertex).
Exercise 8 : Changing the styling of a tailored collar.
1 Clear the screen using the command File/New. Answer “No”
when the program asks whether you want to save the file or not. Run the
macro Ljacket.mac (File/Macro).
2 Remove all other pattern pieces except for the collar and the CF-piece
of the jacket (Edit/Erase). Do not remove the turning line for the lapel.
3 Move collar so that it touches the CF piece: choose the command Edit
Move. Select the collar, M1, accept, M2. Choose as the base point of the
move the point of the collar which is marked with an arrow in the picture,
M1, and as the destination point of the move the point of the CF piece
marked with an arrow in the picture, M1. Use snap to end point to be exact
<Ctrl F3>.
4 Draw a cutting line, which starts from outside of the CF piece, goes
along the turning line of the lapel, and continues from there as a tangent
line across the collar. Because this line has more than two points, you
cannot use the Line drawing tool. Use the Draw/ Polygon tool. Choose the
first point of the polygon somewhere outside the CF piece (look at the
picture), M1. Choose the following points of the line (polygon) at the
bottom edge of the turning line for the lapel, M1, and at the top edge
of the turning line for the lapel, M1. Open the drop-down menu for the
polygon with M2 and choose from it "Tangent Line" (= a line
which continues in the same direction as the previous segment of the polygon),
M1. Finally, place the last point of the cutting line outside the collar,
M1. Pan the view using the arrow keys in keyboard, if you need to.
5 Cut the collar and the CF piece with the line you just drew. Use the
command Edit/Cut. Select the collar, M1 and accept it, M2. Select the
cutting line, M1, accept, M2. (It is easiest to select a line near its
end point. Select the CF piece, M1, accept, M2. Select the cutting line,
M1, accept, M2.
Look at the blue command line at the bottom of the screen to see that
the cut really has taken place (you should see “Calculating …
done”).
6 Remove the cutting line. Use the command Edit/Erase. Select the line,
M1, and accept the selection, M2.
7 Mirror the small pieces of the collar and the lapel you just cut,
on top of the front piece. Use the command Edit/Mirror. Select the collar,
M1, and the lapel piece, M1. Accept the selection, M2. Point the bottom
end of the line across which the mirroring is to be done (= bottom end
of the turning line of the lapel, M1 (look at the picture). Point the
top end of the mirroring line (= the point where the cutting line crossed
the collar, M1 (look at the picture).
8 Remove the original cut pieces of the collar and the lapel (Edit/Erase).
9 Alter the collar and/or the lapel to the shape you want by moving
its point(s). Use the command Point/Move vertex. Select the points to
be moved, M1, M1 …, accept the selection, M2. Choose the base point
of the move (preferably near the points to be moved), M1. Move the mouse
and choose the destination of the move anywhere you want it to be, M1.
If you are not pleased with the result, undo the move with the command
Edit/Undo and try again.
10 When you are satisfied with the new shape of the collar and the lapel,
mirror them back to their original position to the left side of the turning
line of the lapel. Use the command Edit/Mirror. Select the collar piece,
M1 and the lapel, M1, accept the selection, M2. Choose the line across
which the mirroring is to be done. It is the same line as the previous
mirroring line, M1, M1.
11 Remove the collar piece and the lapel on the CF piece (Edit/Erase).
12 If you want to, you can join the collar pieces to each other, and
join the lapel to the CF piece (Edit/Join). This is not necessary, but
if you want to draw seam allowances around the pieces, it is easier when
the pieces are joined.
 Exercise
9 : Adding ease to patterns Exercise
9 : Adding ease to patterns
Note : PatternMaker macros produce patterns
which are ready to sew. You don’t have to add ease to them. If you
want to sew a T-shirt or a sweater with the shirt patterns, or an overcoat
with the jacket patterns, then you may want to add ease to the patterns.
1 Clear the screen using the command File/New. Answer “No”
when the program asks whether you want to save the file or not. Run the
macro Lbodice.mac (File/ Macro).
2 Erase all other pieces but the front and the back pieces and the back
waist dart. Choose the command Edit/ Erase. Select the pieces to be erased
one by one, M1, M1, M1…, accept, M2.
3 Move the points of the front and the back piece. Select the points
with the help of a selection window as in the picture: Choose the command
Point/Move Vertex. Type from keyboard "W" or click the window
icon in the icon area with M1. Choose one corner of the selection window,
M1, move the mouse and choose the opposite corner of the selection window,
M1. Accept selection with M2.
Exercise 10: Sleeve with gathers
1. Run the basic bodice macro (File /Macro Lbodice.mac). Remove all
pattern pieces except the sleeve and its center line (Edit /Erase).
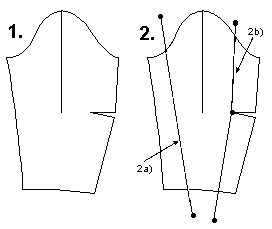
2. a) Draw lines to cut the sleeve with. Refer to the picture.
2. b) You must draw the left side line using the polygon
tool (pencil icon or Draw /Poly … Open), because it needs to contain
three vertices. Draw the polygon through the apex of the elbow dart (CtrlF3
to snap to the apex)
2. c) Cut the sleeve in turn with each of these lines (Edit /Cut): choose
the command, select the object to be cut (= sleeve), M1, accept M2 and
then the cutting object (= line), M1, accept, M2
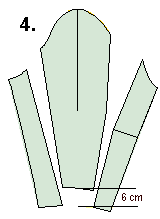
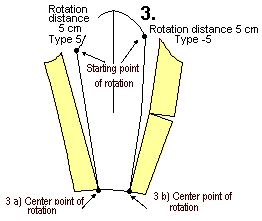
3. a) rotate the leftmost new piece of the sleeve counterclockwise:
use command Edit /Rotate; select the piece, M1, accept M2; choose the
starting (base) point of the rotation, M1, and the point to be rotated
about, M1, (marked in the picture) and type the distance to be rotated
from keyboard "5" <Enter>.
3. b) rotate the rightmost new piece of the sleeve clockwise: use command
Edit /Rotate. When typing the distance from the keyboard, type "-5"
<Enter>. The negative number means the rotation is to be made clockwise.
4. Move the center piece of the sleeve 6 cm up (Edit /Move): choose
the command, select the piece to be moved with M1, accept M2. Type as
the base point of the move "0,0" <Enter> and as the destination
of the move "0,6" <Enter>.
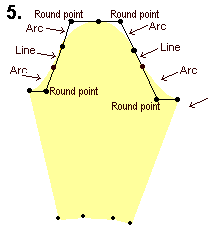
5. Draw the new shape of the sleeve along the existing vertices (Draw
/Poly, CtrlF3).
If needed, correct the shape of the sleeve cap by moving one or more
vertices (Point /Move vertex). Note that both sides of the sleeve cap
are formed of two arcs with a line in between. In order for the arcs to
merge smoothly into each other, the corner point of each arc should lie
along the same line as the straight segment.
Exercise 11: A flared collar
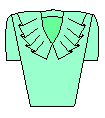
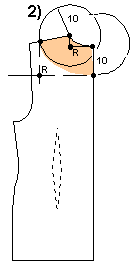
1. Use the basic bodice macro for this exercise (File /Macro, Lbodice.mac).
Erase the sleeve and its center line (Edit /Erase). Rotate the front side
piece so that the shoulder/bust dart is closed (Edit /Rotate, CtrlF3).
The center point of the rotation is the dart apex point, the base point
of the rotation is the right side point of the shoulder/bust dart points
on the shoulder, and the destination point of the rotation is the left
side point of the shoulder/bust dart points on the shoulder.
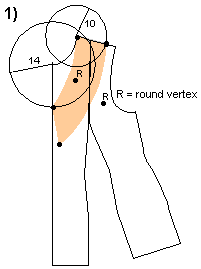
Design the shape of the collar upon the front piece the collar (Draw/Polygon).
For this purpose draw guide circles at the front neck shoulder point (radius
10) and the front neck CF point (radius 14 cm) (Draw /Circle, CtrlF3,
14<Enter>)
Using the guide circles draw the shape of the front collar
(Draw /Poly, CtrlF3). Refer to the picture. Notice that there are arcs
and lines in the collar. In the picture the arc corner points (round points)
are marked with letter "R". When you come to the starting point
of an arc, change the polygon tool to arc mode by opening the polygon
menu with M2 and choosing the option "Arc (X)".
2. Draw guide circles (Draw /Circle, CtrlF3) and the shape
of the back collar on the back piece (Draw /Poly, CtrlF3).
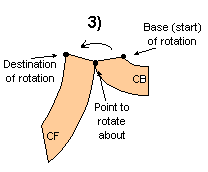
3. Move the front and the back collar so that they touch
each other at their joint shoulder vertex as in the picture (Edit /Move,
CtrlF3). Rotate the back collar so that you get a joined collar (Edit
/Rotate, CtrlF3). The center, base and destination points have been marked
in the picture.
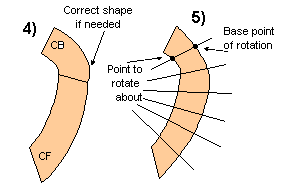
4. Join the pieces (Edit/Join). If needed, correct the shape of the
collar in the place which is marked in the picture with an arrow by moving
a point (Point /Move vertex).
5. Draw cutting lines on the collar (Draw /Line).
Cut the collar with the lines (Edit /Cut): Choose the command, select
the piece to be cut (= the collar), M1, M2, and then the piece to cut
with (= the line), M1, M2. Then cut the remaining pieces of the collar
with the remaining cutting lines similarly. Erase the cutting lines (Edit
/Erase).
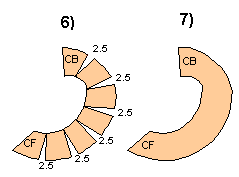
6. Rotate the pieces of the collar so that the outer edge of the collar
opens (= increases) by 2.5 cm at each intersection of the collar edge
and the cutting lines (Edit /Rotate). Choose the command, select the topmost
piece of the collar, M1, accept M2. Choose the center point of the rotation
as in the picture, M1, M2 and type the rotation distance from keyboard
"2.5" <Enter>. Continue to rotate all the collar pieces
similarly.
7. Finally join the pieces of the collar together into one piece (Edit
/Join). Choose the command, select the topmost of the pieces, M1, accept
M2 and the second from the top, M1, M2. Select again the topmost piece
(= which now is a combination of the two joined top pieces), M1, M2 and
the next piece, M1, M2. Join the collar piece by piece in this way.
Exercise 12: A draped dress
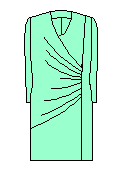
1. Use the dress macro for this exercise (File /Macro, Ldress.mac).
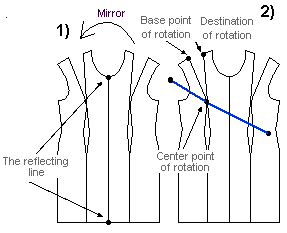
Erase the sleeve, the back pieces and the facings. Make a mirror copy
of the front pieces (Edit /Mirror, CtrlF3). Choose the command, select
the front pieces, M1, M1 and accept, M2. Then choose as the top end of
the reflection line the CF line top (= the neck) vertex, M1, and as the
bottom end of the reflection line the CF bottom (= the hem) vertex, M1.
2. Draw a cutting line across the mirrored front side piece as in the
picture (Draw /Poly, CtrlF3). Because you need more than two vertices
for the line, you have to use the polygon tool and not the line tool.
Select as the starting point of the line any point outside the armscye,
M1, as the second point of the line the bust apex point, M1 and as the
end point of the line any point outside the original front side piece,
M1, open the polygon menu with M2 and conclude the command by choosing
"Open (done)" from the options. Cut the mirrored front side
piece with this line (Edit /Cut). Choose the command, choose the object
to be cut (= mirrored front side piece), M1, accept M2 and then the piece
to cut with (= the cutting line), M1, M2.
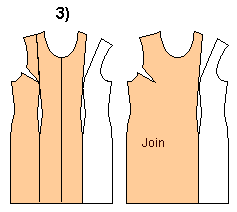
3. Transfer the dart by rotating the topmost of the cut pieces so that
the shoulder dart is closed and a dart opens up at the armscye (Edit /Rotate,
CtrlF3).
Join all front pieces except the original front side piece
into one piece (Edit /Join).
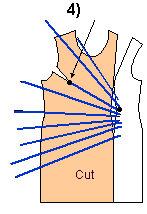 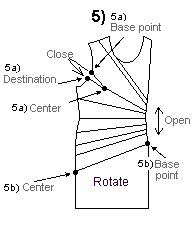
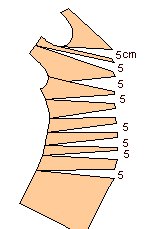
4. Draw cutting lines across the joined front pieces as
in the picture (Draw /Line). All the lines have to extend beyond the edges
of the piece. Notice that one cutting line has to go through the bust
apex. Use snap to end point (CtrlF3) to be exact. Cut the piece with the
lines that you drew (Edit /Cut).
5. a) Rotate the pieces so that the dart which was moved to the armscye
is closed and so that
b) each intersection of the cutting lines is opened to 5 cm. The center
and base points of the rotation have been marked in the picture. The distance
of the rotation is given by typing from the keyboard "5" <Enter>.
Rotating points and objects
Please refer to the User's Manual to get more information about rotating
points and objects.
Memorize this rule for rotating objects and points
Click the mouse as follows
M1 (selection of the objects/points to be rotated), M2 (accepting the
selection), M1 (center point), M1 (base point), M1 (destination point)
i.e.
M1, M2, M1, M1, M1 or
M1, M2, M1, M1, distance <Enter> or
M1, M2, M1, angle <Enter>
EXERCISE 13 : Rotating an object to close the bust dart
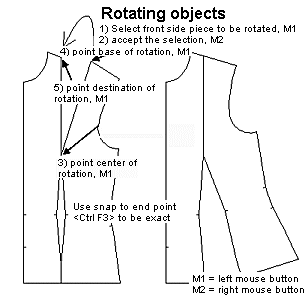
1 Clear the screen using command File/New. Answer “No” when
the program sakes whether you want to save the file or not. Run the macro
Lbodice.mac using the command File/Macro. Accept the default measurements
by clicking <OK> and <OK> with M1. Zoom the drawing to fill
the screen by pressing the <End> key.
2 Remove the back piece and its darts well as the sleeve and its centerline
using the command Edit/Erase. Choose the command, then select the objects
to be removed one by one, M1, M1, M1, M1 and accept the selection, M2
3 Zoom the drawing to fill the screen by pressing the <End> key
4 Choose the command Edit/Rotate. Continue the exercise, referring to
the picture below.
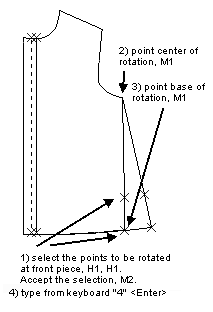
EXERCISE 14 : Rotating points to make an A-line tunic
1 Clear the screen using the command File/New. Answer “No”
when the program asks whether you want to save the file or not.
2 Run the macro Lshirt.mac using the command File/Macro. Accept the
default measurements offered by clicking <OK> and <OK> with
M1. Zoom the drawing to fill the screen by pressing the <End> key.
3 Erase the sleeve and its centerline as well as the collar and the
cuff pieces using the command Edit/Erase. Select the objects to be erased
one by one, M1, M1…. And accept the selection, M2.
4 Zoom the drawing to fill the screen by pressing the <End> key.
5 Choose the
command Point/Rotate vertex. Continue the exercise according to the picture
below.
Exercise 15 : From tailored collar to shawl collar
1 Clear the screen using the command File/New. Answer “No”
when the program asks whether you want to save the file or not. Run the
macro Ljacket.mac (File Macro).
2 Erase all other pieces except the CF piece and the collar.
Choose the command Edit/ Erase. Select all the pieces to be erased one
by one, M1, M1, M1…, accept, M2.
3 Erase all other pieces except the CF piece and the collar. Choose
the command Edit/ Erase. Select all the pieces to be erased one by one,
M1, M1, M1…, accept, M2.
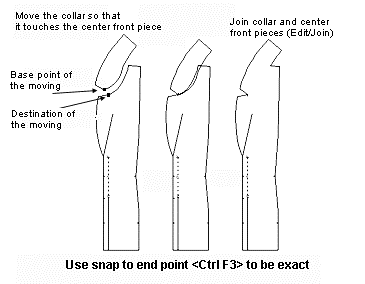
4 Move the collar so that it touches the CF piece (as in picture): Choose
the command Edit/ Move. Select the collar, M1, accept, M2. Choose as the
base point of the move the collar point which is marked with an arrow
in the picture, M1, and as the destination point of the move the point
of CF piece which is marked with an arrow in the picture, M1. Use snap
to end point to be exact (<Ctrl F3>).
5 Join the collar to the CF piece: after choosing the command Edit/
Join, select the collar, M1, accept, M2 and select the CF piece, M1, accept,
M2.
6 If you want to, you can remove the angle in the shawl collar by deleting
the points in it. Choose the command Point/Delete vertex. Select the points
to be removed, M1, accept, M2.
HINT: Even if the outer edge of the shawl collar can be seen without
joining the pieces, it is usually wise to join the pieces. This way, it
is much easier to draw seam allowances around the pieces.
Exercise 16 : From jacket to A-line jacket

1 Clear the screen using the command File/ New. Answer “No”
when the program asks whether you want to save the file or not. Run the
macro Ljacket.mac (File/ Macro).
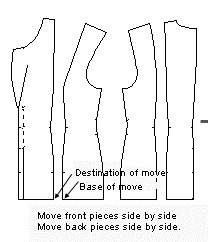
2 Move the front and the back pieces so that they touch at the hem (Edit/
Move). The base and destination points of the move have been marked in
the picture.
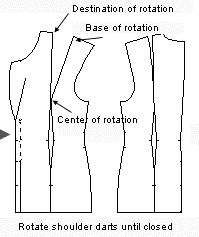
3 Rotate the shoulder/bust dart of the front piece until it is closed
(Edit/ Rotate). The center, base and destination points of the rotation
have been marked in the picture. Use the snap to end point <Ctrl F3>
to be exact. Rotate the back shoulder dart in the same way to close it.
4 Join the front and the back pieces so that you get a single front
and back piece. Choose the command Edit/ Join. Select one of the pieces
to be joined, M1, accept, M2. Select the other piece to be joined, M1,
accept, M2.
Look at the blue command line at the bottom of the screen. You should
see: "calculating … done". Sometimes it may happen that
the program cannot join pieces whose edges just touch. In such a situation,
delete one or more of the overlapping segments from one of the pieces
or both. (Point/ Delete Segment). Select the segment you want to delete,
M1, accept, M2. Note that there should be two segments together, one from
each object.
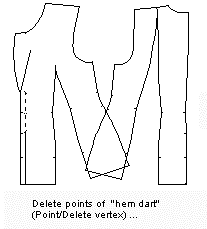
5 Delete the points of the “hem dart” which appeared when
you joined the pieces (Point/Delete Vertex). Select the points to be deleted
one by one, M1, M1, M1 …, accept the selection, M2
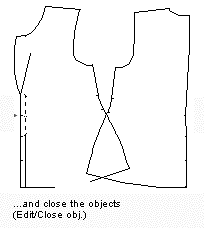
6 After you have deleted the points, if the piece has an open section
at the hem, close it using the command Edit/Close Obj. Select the piece
to be closed, M1 and accept the selection, M2.
Exercise 17 : Moving a dart to another place
1 Continue from where you left off in the previous exercise.
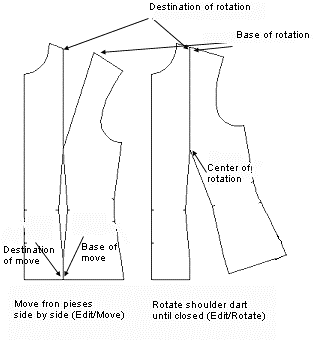
2 Move the front pieces to that they touch at hem. Choose the command
Edit/Move. Select the piece to be moved, M1, accept, M2. Choose the base
and destination points marked in the picture below, M1, M1. Use snap to
end point to be exact <Ctrl F3>.
3 Rotate the front shoulder/bust dart until closed. After choosing the
command Edit/Rotate and the piece to be rotated (M1, M2) choose the center,
base and destination points of the rotation as marked in the picture below,
M1, M1, M1.
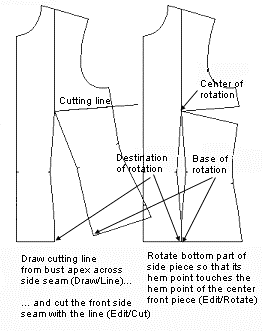
4 Draw a line from the bust point (apex) across the front side seam.
After choosing the command Draw/Line, Use M1 to enter the end points of
the line. The line must begin exactly at the bust point and therefore
you should use snap to end point <Ctrl F3>.
5 Cut the front side piece with the line you drew (Edit/Cut). After
choosing the command, select the side piece, M1 and accept, M2. Then select
the cutting line, M1, M2. Look at the blue command line at the bottom
of the screen to see that the cut was made successfully. You should see
the words "Calculating … Done".
6 Erase the cutting line (Edit/Erase). Choose the command, then select
the line, M1 and accept the selection, M2.
7 Rotate the bottom part of the side piece so that the shoulder/bust
dart is closed. Choose the command Edit/Rotate and the piece to be rotated
(M1, M2) point the center, base and destination points, M1, M1, M1.
8 Rotate the bottom part of the side piece so that the shoulder/bust
dart is closed. Choose the command Edit/Rotate and the piece to be rotated
(M1, M2) point the center, base and destination points, M1, M1, M1.
NOTE
!
When using the cutting the command (Edit/Cut), you always have to
select the piece to be cut first, and the piece to cut with second.
Exercise 18: Drafting a raglan sleeve
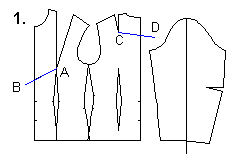
1. Run the basic bodice macro (File /Macro, Lbodice.mac). Erase the
center line of the sleeve (Edit /Erase). Move the front and back shoulder
darts temporarily to CF and to CB. First, draw cutting lines from the
dart apexes to and across the CF and CB lines = A-B and C-D (Draw /Line,
CtrlF3). Cut the center front piece and the back piece with the cutting
lines (Edit /Cut). Choose the command, select the object to be cut (=
center front or back piece), M1, accept M2. Then select the object to
cut with (= cutting line), M1, accept M2. Cut the other piece the same
way.
Cut the sleeve into two pieces: Draw a cutting line upon the sleeve
starting from the center point of the sleeve cap and ending at the vertex
which is at the center of the sleeve cuff (Draw/Line, CtrlF3). If needed,
make the vertices visible with F5. After having drawn the line, cut the
sleeve with it (Edit /Cut). Choose the command, select the object to be
cut (= the sleeve), M1, accept M2 and the object to cut with (= line),
M1, accept M2.
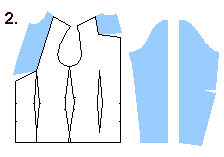
Erase all cutting lines.
2. Rotate the upper piece of the center front piece and the upper piece
of the back piece until the shoulder darts are closed (Edit /Rotate, CtrlF3).
Choose the command, select the object to be rotated, M1, accept M2. Then
point the vertex to rotate about (= the dart apex), M1 and the base point
of the rotation (= at front the left side vertex of the shoulder dart
at the shoulder and at back the right side vertex of the shoulder dart
at the shoulder), M1. Finally, point the destination point of the rotation
(= at front the right side vertex of the shoulder dart at the shoulder
and at back the left side vertex of the shoulder dart at the shoulder),
M1.
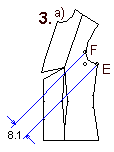
3. a) Measure the distance between vertices E and F = the armscye curve
at front. Use the dimension tool (Draw /Dimension, CtrlF3). Choose the
command, select one end of the distance to be measured (= E), M1 and then
the other end of the distance to be measured (= F), M1. Move the mouse
and click the place where you want the distance to be displayed. In the
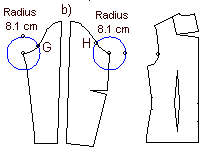
picture the distance is 8.1 cm. On the back piece there is a similar vertex
with similar distance from the back armpit vertex.
b) Draw guide circles with a radius of 8,1 cm with the center points
at the armpit vertices as in the picture. (Draw /Circle, CtrlF3). Choose
the command, point at the center point of the circle and then type the
radius from the keyboard, 8.1 <Enter>. Add new vertices at the intersection
of the circles and the armscye lines (Point/ Add vertex). Having chosen
the command, select the arc where the new vertex is to be added at the
armscye, M1, accept M2. Choose the position of the new vertex using snap
to intersection, CtrlF7. We mark these vertices with letters G and H.
4. Move the front (= left) half of the sleeve to a place where vertex
F of the front piece and vertex G of the front sleeve are one on top of
the other. Use command Edit /Move and snap to endpoint, CtrlF3). Choose
the command, select the piece to be moved (= the left half of the sleeve),
M1 and accept, M2. Point with M1 vertex G as the starting (base) point
of the move and vertex F as the destination point of the move. Move the
back half of the sleeve accordingly.
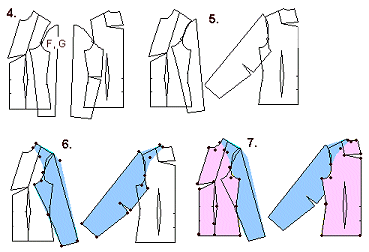
5. Rotate the front sleeve so that it touches the shoulder tip vertex
(Edit /Rotate, CtrlF3). After having chosen the command select the object
to be rotated (= front sleeve), M1 and accept, M2. Choose as the point
to rotate about vertex F, M1. Click with M1 for the starting point of
the rotation anywhere on the screen, M1. Move the mouse and when the the
sleeve head touches the shoulder tip, click with M1 for the destination
of the rotation. Rotate the back sleeve accordingly.
6. Draw the raglan sleeves along the existing vertices. Please refer
to the picture to see vertices of the sleeve to be drawn. Use command
Draw /Poly. Choose the vertices of the polygon one by one, M1, M1, M1…
When you have pointed all the vertices and come to the last but one vertex,
open the polygon menu with M2 and choose the option "Done (closed)".
When drawing use the snap which you find best in the situation in question,
CtrlF3 or CtrlF4 or no snap. You can draw the arcs "angular"
and change the vertices in question later to round vertices (Point/Round
vertex).
7. Draw the new front and back pieces accordingly (Draw /Poly, CtrlF3).
Go along the existing vertices. Draw the front pieces in three separate
pieces i.e. upper part of the center front piece, the lower part of the
center front piece and the front side piece. Draw the back piece also
in three separate pieces i.e. the upper part of the center back piece
and the lower part of the center back piece and the back side piece.
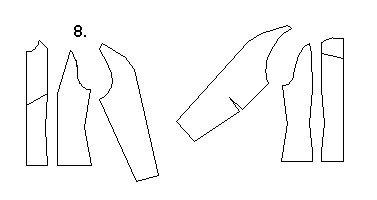
8. Rotate the upper part of the center front piece to close
the temporary dart at the CF (Edit /Rotate, CtrlF3). Choose the command,
select the object to be rotated (=the upper part of the center front piece),
M1, accept M2. Choose the dart apex as the point to rotate about, M1,
the upper vertex of the dart at the CF line as the starting point of the
rotation, M1 and the lower vertex of the dart at the CF as the destination
point of the rotation, M1. Rotate accordingly the upper part of the center
back piece to close the temporary dart at the CB and to move it to the
shoulder. Join the front and back center pieces together into whole pieces.
Exercise 19: A-line dress by rotating points
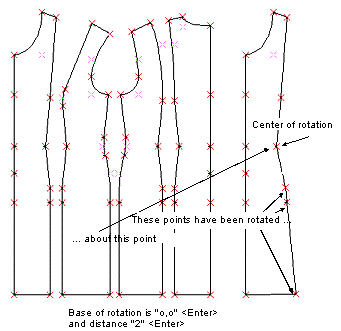
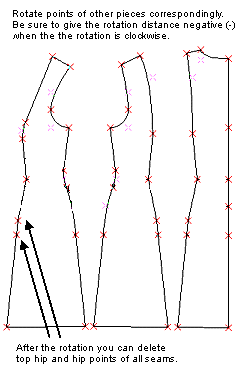
1 Clear the screen using the command File/New. Answer “No” when
the program asks whether you want to save the file or not. Run the macro
Ldress.mac (File/Macro). Erase the sleeve and its centerline as well as
all facings. After choosing the command Edit/Erase, select the objects
to be erased one by one M1, M1. M1 … accept selection, M2.
2 Choose the command Point/Rotate Vertex. Select the points of the CF
piece to be rotated, M1, M1, M1 (look at the caption "These points
have been rotated" in the picture below). Then select the center
point of the rotations at the waist point of the piece, M1 (refer to the
picture). Choose the hem point as the base point of the rotation, M1.
Type as the distance or end point of the rotation, from keyboard, "2"
and press <Enter>.
3 Continue as in the picture and rotate the corresponding points of
other pattern pieces. Please note that the points of the CF and CB lines
are not rotated.
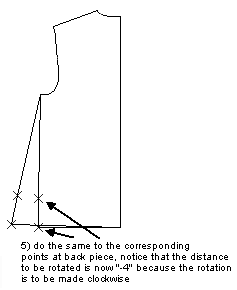
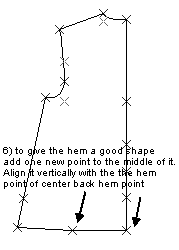
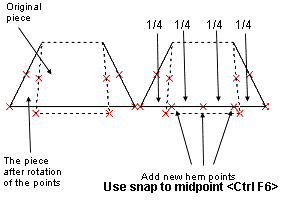
NOTE! When you rotate the points of both
sides of a pattern piece, the hem rises to the level where the hem points
will be after the rotation. Therefore it is necessary – at least
when the amount of the rotation is large – to add a new point to
hem between the hem points which are to be rotated. This new point remains
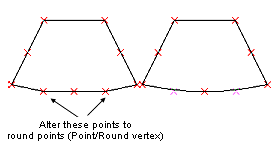
on the correct hemline after the rotation. To be able to curve the hem,
you also need to add additional new points between the original hem
points and the point you just added. Look at the picture below.
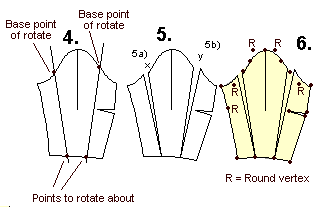
Exercise 20: An overcoat based on the jacket
patterns
1.a) Run the jacket macro (File /Macro). Use the maximum ease option
(= bust circumference +16 cm). Type the length according to your wishes,
e.g. 60 cm.
b) Add 4 cm ease to the garment (the ease of the overcoat will be 16
+ 4 = 20 cm). Add the ease by moving the right side vertices of the center
front piece 1 cm to the right and the left side vertices of the center
back piece 1 cm to the left: use command Point /Move vertex for each of
these two moves. Select all the vertices to be moved M1, M1, M1 …,
before accepting the selection, M2. Show the points if needed by typing
<F5>. Use snap to end point, CtrlF3, if it helps. Type the base
point of the move from keyboard "0,0" <Enter>. Type as
the destination point of the move from keyboard "1,0" <Enter>
(front) and "-1,0" <Enter> (back).
The jacket has round points at the back shoulder dart apex. Before going
on, it is best to change these points to corner points (Point /Corner
vertex).
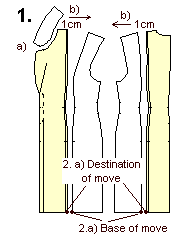
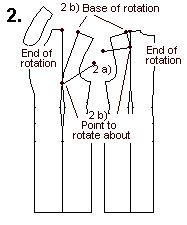 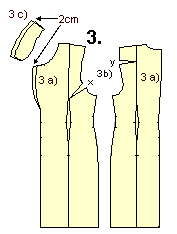
2. a) Move the two front pieces and the two back pieces
together, so that they touch at the hem (Edit /Move): choose the command,
select the front side piece, M1 and accept the selection, M2. Choose as
the base point of the move the leftmost hem point of the front side piece,
M1, and as the destination point of the move the rightmost hem point of
the center front piece (shown in the picture). Use snap to end point,
CtrlF3, to be exact. Move the back pieces the same way, so that they touch
each other at hem. Draw a cutting line from the front shoulder/bust apex
to and across the front armscye (Draw /Line) and from the back shoulder
dart apex to and across the back armscye. Be sure to use snap to endpoint
to be exact, CtrlF3. Cut the front and back side pieces with the lines
you drew. Use command Edit /Cut. Select the piece to be cut, M1, accept
M2, then select the piece to cut with (= the cutting line), M1, accept
M2.
2. b) Rotate the top pieces (which you cut) so that the
shoulder darts are closed (Edit /Rotate, CtrlF3): having chosen the command
select the piece to be rotated, M1, accept M2. Then select the point to
be rotated about (= the dart apex point) and the base and the destination
point of the rotation M1, M1, M1 (refer to the picture).
3. a) Draw the front and back pieces of the overcoat along the existing
points (Draw /Poly, CtrlF3). Type F5 to see the points. If you need to
correct the shape of the armscyes, do it by moving one or more vertices.
(Point /Move vertex).
3. b) Measure the length added to the front and the back armscyes =
x and y. Use the Dimension tool (Draw /Dim) and snap to end point (CtrlF3).
Choose the command, select the base point and the destination point of
distance to be measured, M1, M1, move the mouse and click the place where
you want the dimension line to be displayed, M1. Write down the measurements,
then erase the dimension lines (Edit/Erase).
3. c) Broaden the collar and the lapel according to your wishes, e.g.
2 cm. Use command Point /Move vertex. Select all the vertices of the collar
to be moved simultaneously, M1, M1, M1 …, accept the selection M2,
click anywhere on the screen with M1 for the base point of the move, move
the mouse and when you are satisfied with the new width of the collar,
click again with M1. Do the same with the lapel. Note: when you broaden
the collar, you have to lengthen its outer edge, otherwise it does not
lie flat on the back. How to do this is explained in Exercise 8.
4. Draw cutting lines for the sleeve (Draw /Line). Be sure to position
the ends of the lines outside the sleeve. Cut the sleeve with the cutting
line (Edit/Cut) .
5. To alter the sleeve to match the altered armscyes, rotate the sleeve
pieces which you cut by the amount that you measured in 3b) = x and y.
Use command Edit /Rotate. Select the leftmost piece of the sleeve, M1,
accept with M2 and rotate it counter clockwise x cm. Select the point
to be rotated about (shown in the picture) and the base point of the rotation
(shown in the picture) and type the distance to be rotated from keyboard
(= x) and type <Enter>.
Rotate the rightmost piece of the sleeve the same way. Note that the
distance to be rotated is now a negative number (=y) as the rotation is
to be done clockwise.
6. Finally, draw the new shape of the sleeve along the existing points
(Draw /Poly, CtrlF3). If you need to check how the sleeve cap is made
of arcs and lines, refer to exercise 1.
Mirroring objects
Exercise 21: Wraparound skirt

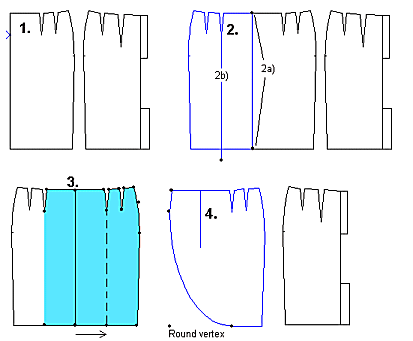
1. Run the basic skirt macro (File /Macro, Lskirt.mac). Erase all pieces
but the front and the back pieces (Edit /Erase).
2. Mirror the front piece (Edit /Mirror). Choose the command, then select
the piece, M1, accept M2 and give the center front line of the skirt as
the line to be reflected across. Draw a vertical line (Draw /Line) starting
from the dart apex (CtrlF3) down (CtrlF5) and across the hem line as in
the picture.
3. Draw the wraparound piece along the existing vertices (Draw /Poly,
CtrlF3). Add points to the CF at the waist and at the hem. Align the hem
CF vertex with vertex of the inner dart apex as in the picture. Use command
Point / AlignX; select first the point according which you want to align
(= inner dart apex) and then the point to be aligned (= hem CF point).
Note, that in the side seam from hip to waist there
is an arc = the top hip (abdomen) vertex is a round vertex. You can change
this vertex to a round vertex afterwards (Point/Round vertex) or you can,
when you come to this point, change the polygon tool to the arc mode by
opening the polygon menu with M2 and choosing from the menu "Arc(x)".
When you have finished the arc, change the polygon tool back to the line
mode (M2 … Line).
4. Move the wraparound piece apart from the front piece (Edit /Move)
and change the vertex in the hem corner to a round vertex (Point /Round
vertex).
Draw the center front line to the wraparound piece (Draw /Line, CtrlF3
and CtrlF5)
Exercise 22: Another wraparound skirt
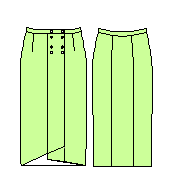 Run
the Lskirt.mac macro (File /Macro). Erase the lining (Edit Erase). Erase
the outer vertices of the back piece zipper and the vent extensions. Run
the Lskirt.mac macro (File /Macro). Erase the lining (Edit Erase). Erase
the outer vertices of the back piece zipper and the vent extensions.
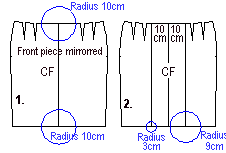
1. Mirror front piece using the center front line as the reflection
line: Choose command Edit/Mirror. Select the front piece M1, accept M2.
Select as the top of the reflecting line the waist point of the CF line,
(CtrlF3) M1, and as bottom of the reflecting line the hem point of the
CF line, M1 Draw guide circles at the waist and the hem points of the
center front line, radius 10 cm (Draw /Circle, CtrlF3).
2. Draw vertical guide lines between the intersections of the 10 cm
circles and the waist and the hem. Draw new guide circles at the intersection
of front hem and the lines you just drew, radii 3 and 9 cm (Draw /Circle,
CtrlF3)
3. a) Draw the right side wrap piece as in the picture,
using the existing points of the right side and dart points of the skirt
and the intersection of the 9 cm circle with the right vertical guide
line. 3. b) Draw the left side wrap piece as in the picture using the
existing points of the left side and dart points of the skirt and the
intersection of the 3 cm circle and the left vertical guide line.
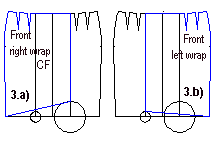
Note that in the side seam from hip to waist there is
an arc = the top hip (abdomen) point is a round vertex. You can change
this vertex to a round vertex afterwards (Point/Round vertex) or you can,
when you come to this point, change the polygon tool to the arc mode by
opening the polygon menu with M2 and choosing from the menu "Arc(x)".
When you have finished the arc, change the polygon tool back to line mode
(M2 … Line). When drawing the wrap pieces, be sure to draw one vertex
at the waist CF to be able to draw the center line later using this vertex.
Erase all the guide circles (Edit /Erase).
4. Draw 7 cm wide facings at the edges of the wrap pieces: a) Draw a
vertical guide line from the top of the front edge of the right side wrap
piece as in the picture (Draw/Line, CtrlF3, CtrlF5).
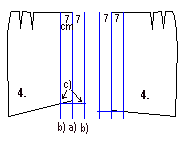
b) Copy this line 7 cm to the right and to the left: use
command Edit / Copy, select the line to be copied, M1 and accept, M2.
Type as the base point of the move "0,0" <Enter> and as
the destination point of the move "7,0" <Enter>. Then
select the same line and type as the base point of the move "0,0"
<Enter> and as the destination point of the move "-7,0"
<Enter>.
c) Draw a help line starting at the intersection of the left line and
the hem and from there horizontally (CtrlF5) to and across the edge of
the piece as in the picture. Use command Draw / Line, choose as the starting
(base) point of the line the intersection of the left line (CtrlF7) and
the hem, change to snap to ortho (CtrlF5), move the mouse and click when
you have moved across the right side guide line.
Draw similar guide lines for the left wrap piece.
5. Draw wrap pieces with facings along the vertices of the existing
wrap pieces and the intersections of the outer vertical line and the horizontal
help line (Draw / Poly). Move wrap pieces with facings to a blank place
on the screen. Erase the help lines and the wrap pieces without facings
(Edit /Erase).
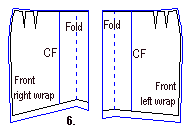
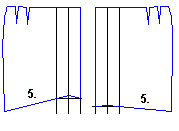
6. Add seam allowances to the wrap pieces (Draw / Seam
Allowance). Give as the seam width 4 cm for the hems, 0 cm for the front
edges and 1 cm for all other edges of the pieces. Draw center front lines
and fold lines for the pieces as in the picture (Draw / Line, CtrlF3).
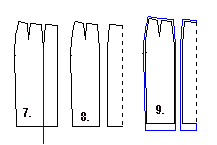
7. Draw a cutting line on the back piece starting from the dart apex
(CtrlF3) and going vertically (CtrlF5) from there to and across the hem
line (Draw / Line).
8. Cut the back piece with the cutting line (Edit /Cut). Choose the
command, select the object to be cut (= the back piece) M1, accept, M2,
and then the object to cut with (= the line), M1, accept, M2. Erase the
cutting line (Edit/Erase) and move back pieces apart from each other (Edit
/ Move).
9. Add seam allowances to the back pieces (Draw / Seam Allowance). Give
as the seam width 4 cm for the hems, 0 cm for the center back seam and
1 cm for all other edges of the pieces.
EXERCISE 23 : Mirroring objects to draft facing
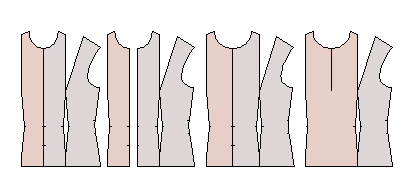
1 Clear the screen using the command File/New. Answer “No”
when the program asks whether you want to save the file or not.
2 Run the macro Lbodice.mac using the command File/Macro. Accept the
default measurements offered by clicking <OK> and <OK> with
M1. Zoom the drawing to fill the screen by pressing the <End> key.
3 Erase the back piece and its waist dart as well as the sleeve and
its center line with the command Edit/Erase. Select the pieces to be erased
one by one, M1, M1, M1, M1 and accept the selection, M2.
4 Zoom the drawing to fill the screen by pressing the <End> key.
Choose the command Edit/Mirror. Select the CF piece as the piece to be
mirrored, M1, and accept the selection, M2.
5 Choose one end of the mirror line at the CF point of the neck opening,
M1, and the other end at the CF point of the hip, M1 (use snap to end
point <Ctrl F3> to be exact).
6 Move the mirrored facing piece 4 cm to the left to form a button extension:
choose the command Edit/Move, select the facing piece, M1, and accept
the selection, M2;
7 Type as the base point of the move, from keyboard, "0,0"
<Enter> and as destination point "-4,0" <Enter>.
8 Move the center front points of the center front piece 2 cm to the
left: choose the command Point/Move Vertex; select all points on the CF
line M1, M1, M1, M1, M1. Accept the selection, M2. Type, from keyboard,
the base point of the move as "0,0" <Enter> and the destination
of the move as "-2,0" <Enter>.
9 Move corresponding points on the CF line of the facing 2 cm to the
right. The command Point/Move Vertex will repeat, so you don’t need
to choose it again. Select the CF points of the facing M1, M1, M1, M1,
M1 and accept the selection, M2; choose as the base point of the move
the CF hem point of the facing, M1, and as the destination point of the
move the CF hem point of the CF piece, M1
10 Join the CF piece and the facing: choose the command Edit/Join, select
the CF piece with M1, accept with M2; select the facing with M1, and accept
with M2.
Using snap
Exercise 24: Drafting facings
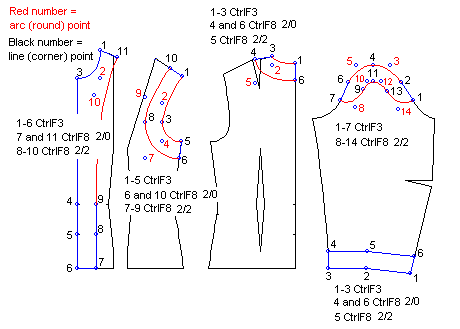
Facings are drafted using two Snap modes -- Snap to End Point (
CtrlF3 ) and Snap to Offset (
CtrlF8 ). Snap to End Point is used to draw along the existing
points of the original pattern piece (e.g. points 1-6 of the CF facing
in the picture) to create the outside edge(s) of the facing, and Snap
to Offset is used to draw the points that form the inside edge(s) (e.g.
points 7-11 of the CF facing in the picture).
Lets assume that you want to draft facings which are 2" wide. Select
the command Draw/Polygon from the main menu. Start by clicking with the
left mouse button (M1) on the vertices that are shared with the original
pattern piece and the facing (e.g. points 1-6 of the CF-facing in the
picture).Use snap to end point CtrlF3.
Then change the snap mode to
Snap to Offset CtrlF8. In this snap mode
two distances are asked . If you want to define a vertex which
is 2" from a vertex of the original pattern piece and on the line
of the original piece (e.g. point number 7 in the CF-facing in the picture
e, which is 2" from vertex 6 and on the hem line of the original
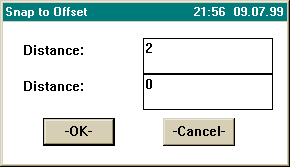
pattern piece), type as the distances 2 and 0 (or 0 and 2; the order of
the distances does not matter) and click <OK>. Move the mouse cursor
near point 6. You will notice that you have a choice of 4 vertices which
are all 2" from point 6 and on a line (or an extension of the line)
forming the original pattern piece. When you move the mouse the cursor
blinks as a yellow cross on these 4 points. Choose the point that corresponds
to point 7 in the picture.
 Points
8-10 are not on a line of the original pattern piece. So you have to change
both of the snap distances to 2. To do this, type CtrlF8, enter
2 for both distances, and click <OK>. Now move the mouse
cursor upwards from point 7. You will notice that the cursor jumps to
a point offset from point 5. Click here to mark point 8. Continue upwards
and click to create points 9 and 10. Change the snap distances again to
2 and 0 (type CtrlF8) and click to create point 11. Points
8-10 are not on a line of the original pattern piece. So you have to change
both of the snap distances to 2. To do this, type CtrlF8, enter
2 for both distances, and click <OK>. Now move the mouse
cursor upwards from point 7. You will notice that the cursor jumps to
a point offset from point 5. Click here to mark point 8. Continue upwards
and click to create points 9 and 10. Change the snap distances again to
2 and 0 (type CtrlF8) and click to create point 11.
Now you have finished marking the points, and it's time to close this
polygon object. Open the menu for the polygon tool by clicking with the
right mouse button (M2). Close the polygon by choosing "Done (closed)"
from the menu.
Note that the facings in the drawings above are formed of arcs and lines.
In the facing you drew in the preceding steps, however, there are only
lines, not arcs. You must now change some of the corners to arcs. In the
pictures the arcs have been drawn with red. There are two arcs in the
CF facing: 1-2-3 and 9-10-11. In the front armscye facing there are two
arcs one after another: 1-2-3 and 3-4-5. The numbers written in red indicate
which points should be round points. Use the Round Vertex command on the
Point menu to change the appropriate points from corner points to round
points.
Alternate method: Rather than going back and converting points
after they are drawn, you can also create arcs and round points as you
draw the polygon. After you click on the point preceding the round point,
change the polygon tool to arc mode by clicking with M2. Choose Arc(x)
from the menu and click on the screen where the round point is to be.
Then change the polygon tool back to the line mode after clicking on the
arc point: open the menu with M2 and choose Line.
Draft other facings correspondingly.
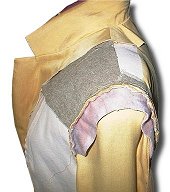 HINT : Why do you want to use a facing
for the sleeve cap? In jackets and coats you get a perfectly shaped sleeve
heads if you use this kind of a facing at the sleeve cap. Use thick, soft
wool fabric for the facing.
When preparing to sew the sleeve to the armscye, set the sleeve and
the facing one on top of the other and ease stitch the facing to the sleeve
cap. Sew
one stitch line through both fabrics using the the longest possible
machine stitches.
Steam facing well, it will shrink and the sleeve cap is gathered
without puckers.
To make the final shaping to the sleeve cap, pull on easestitching
in the sleeve cap. Sew the sleeve to the armscye
along the easestitching . The facing is fastened simultaneously.
Steam the seam allowances of the sleeve cap toward sleeve.
Another way of doing this is to use a
bias strip of wool fabric in stead of the facing.
Scaling and resizing the objects
Exercise 25: Patterns for leggings from the basic pants patterns
1. Run the basic pants macro (File /Macro). Give as the cuff circumference
the final desired cuff circumference of the leggings, e.g. 28 cm. Remove
pockets, waistband, zipper placket, grain lines and the pocket mouth line
from the front piece (Edit/Erase).
2. Make a mirror-image copy of the front piece. Use command Edit /Mirror,
select the front piece, M1, accept M2, give any vertical line as the line
to be reflected against, use snap to ortho if you need (CtrlF5). Erase
the original front piece.
Move the mirrored front piece so that it touches the back piece at the
hem (Edit /Move, CtrlF3). Choose the command, select the front piece,
M1 and accept, M2. Give as the base point of the move the leftmost vertex
of the cuff of the front piece, M1 and as the destination point of the
move the rightmost vertex of the cuff of the back piece, M1.
Rotate back piece so that it meets the front piece at the hip (Edit
/Rotate). The point to be rotated about is the shared vertex of the cuffs,
M1, and the base point of the rotation is any point on the screen, M1.
Move the mouse and click M1 again when you are satisfied with the distance
of the rotation ( the front and the back hips meet).


3. Draft the leggings pattern by "tracing" along the existing
points of the front and the back piece (Draw /Poly, CtrlF3). Use F5 to
display the existing points. As you draw, skip over the waist darts and
the waist side curve at the center front and at the center back. Also,
make the curve a little deeper at the thigh and the knee area (deactivate
snap CtrlF1 for this). Note, too, that there are arc points in the patterns.
These points determine the shapes of curves. You recognize arc points
by looking for the green points which do not lie on a line but beside
it. When you come to this kind of a point in the drawing, change the polygon
tool to the arc mode, (M2 … Arc(x)), click on the arc point, and
then change back to the line mode after the arc (M2 … Line). If you
find this difficult, you can draw the object with corner points and change
the points needed to round points after you have finished drawing the
object. (Point /Round vertex).
4. Move the leggings pattern to another place. Remove the original pattern
pieces. Draw the grain line for the leggings pattern (Draw /Line). Use
snap to midpoint (CtrlF6) to place the line exactly on the midpoints of
the waist and the cuff. Hold the mouse still and wait for the cursor to
stop moving before you click on the midpoint. (Calculating midpoints while
the mouse is moving is a lot of work for your computer's processor, so
it may be slow to respond when you are in snap to midpoint mode.) If you
find it difficult to keep the cursor in its place, you can - instead of
clicking the mouse on the midpoint - accept the point by typing <Enter>
with your other hand.
5. Resize the pattern according to the elasticity of the fabric you
are going to use (Edit /Resize). Let us assume that your fabric stretches
20 % horizontally and 10 % vertically, then the scaling factors, which
the program asks would be x=0.8 and y=0.9. Choose the command, select
the object to be resized, M1 and accept, M2. Then type from keyboard "F"
for scaling factor. Type in the dialog box "0.8" as the x scaling
factor and "0.9" as the y scaling factor and click <OK>.
6. If you want to sew bike shorts, shorten the legs according to your
wishes. Draw two circles to use as guides in drawing the cutting lines.
If you want the shorts to be 20 cm long from the crotch, use circles with
a radius of 20 cm. Position the center points of the circles at the front
and back crotch points (Draw /Circle, CtrlF3, M1). Type in "20"<Enter>.
Repeat for the second circle. Then draw a line which starts and ends at
the intersection of the circle and the leg (Draw /Line, CtrlF7). Deactivate
snap to intersection when you don't need it any more. It makes your program
very slow (CtrlF1).
7. Then cut the pattern with the line you drew (Edit /Cut). Choose the
command, choose the object to be cut, M1, accept M2, and then the object
to cut with, M1, accept M2. Erase the circles and the cutting line as
well as the lower leg piece (Edit /Erase).
More designs
In the following you have some exercises without specific instructions.
Look carefully at the pictures, we are sure you can do these exercises,
too. Use as your basic blocks the basic bodice or another macro, according
to your wishes. Be certain to have the needed ease in the garment.
Exercises 26 and 27: Two corset tops for evening dresses


Exercise 28: A long evening dress and a bolero


Exercise 29: Drafting a flat collar

Exercise 30: A closely fitting evening jacket
Use the jacket minimum ease patterns = 12 cm bust ease
as base for this design


Nobody is a born master
If you have not used CAD programs before, you may feel at the beginning
that drafting patterns with such a program is clumsy. Sometimes you may
think, “This could be done quicker with a pencil and paper.”
That might be true - at that time.
After you have learned to use the program, you will notice that PatternMaker
is superior to any method of drafting the patterns manually. You can alter
the patterns on the screen and print the patterns only when you are satisfied
with them. You can easily compare different versions of patterns, print
them as miniature patterns and save them for future use.
If you want to alter the patterns drafted by the macros and you have
not yet learned how to do it quickly with the editing tools of the program,
you can print the patterns out and then make the alterations manually,
with a pencil or scissors, before you cut the patterns.
Now you have learned the program and will be able draft any kind of
patterns for yourself or for your friends, or if you are in a line for
business, for your customers. Only your own imagination and creativity
set limits for you.
There is no sense - nowadays - to draft the basic patterns manually.
It is pure mathematics and can well be done by a machine. You should concentrate
on things that the machine cannot do: creating fashion patterns and your
own designs. If you feel you want to learn more, just wait. In the near
future we shall launch the advanced lessons with at least 20 design exercises.
With these new lessons you'll not only learn to use PatternMaker even
more effectively but also a lot of design techniques.
| ![]() Site
Map
Site
Map


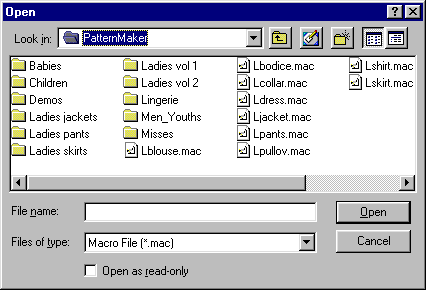


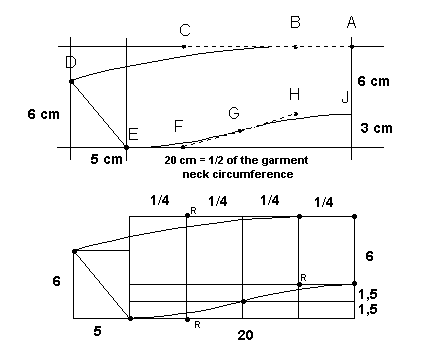


 1.
Measure the neck circumference of the garment (not your neck circumference).
Divide it by 2.


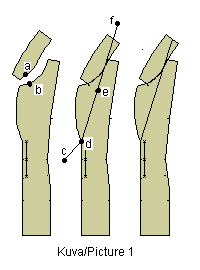
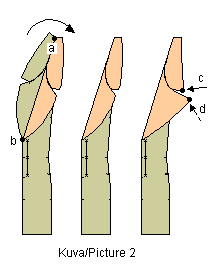

 Exercise
9 : Adding ease to patterns


 Run
the Lskirt.mac macro (File /Macro). Erase the lining (Edit Erase). Erase
the outer vertices of the back piece zipper and the vent extensions.


 Points
8-10 are not on a line of the original pattern piece. So you have to change
both of the snap distances to 2. To do this, type CtrlF8, enter
2 for both distances, and click <OK>. Now move the mouse
cursor upwards from point 7. You will notice that the cursor jumps to
a point offset from point 5. Click here to mark point 8. Continue upwards
and click to create points 9 and 10. Change the snap distances again to
2 and 0 (type CtrlF8) and click to create point 11.