|
PatternMaker Macros: Bodice Block Macros For Men, Women, Misses, Children and Babies
To downlaod and buy macros, please go to the PatternMaker Website.
This macro collection contains bodice blocks for men, women, misses,
children and babies in many ease categories. The men's bodice blocks can
be used to draft patterns for young men. Using these macros you can assemble
patterns for a garment and its details according to your own wishes. In
these instructions you get instructions of how to draft patters for a
ladies' jacket and draped blouse using the basic bodice blocks. Later
on I shall start publishing design lessons for different kind of garments
for these macros.
Seam allowances
The bodice macros do not contain any seam allowance. Add seam
allowances using command Draw / Offset or Draw / Seam allowances after
you have made all the design changes to the patterns. The pattern pieces
have not been grouped as in other macro collections. This is because you
always have to make more or less alterations to the patterns which is
easier to do if the pattern pieces are ungrouped.
Ease options
In men's, women's and misses' bodice blocks have 10 ease options.
Choose the ease category according to the garment type and design and
fabric thickness. Normal ease for a sloper is 8 cm. The sloper can be
used to sew a test garment, muslin, to test that the measurements have
been taken correctly. With this ease and sewn of non-elastic fabric the
sloper should sit on the subject like a second skin, very tightly.
Ease categories from 0 to 4cm cannot be used for garments sewn of non-elastic
garments and ease category 8 cm only in special cases.
Men, women and misses
0 cm, 0"
Tightly figure hugging garments of elastic fabrics
Lingerie
4 cm, 1 1/2"
Tightly fitting evening garments
Garments of elastic fabrics
8 cm, 3"
Tightly fitting blouses and dresses of thin woven fabrics
Tightly fitting evening jackets and boleros
10 cm, 4"
Blouses of thin woven fabrics
Tightly fitting jackets of thin woven fabrics
Tightly fitting sleeveless dresses
12 cm, 4 1/2"
Blouses, dresses, fitting jackets, vests
14 cm, 5 1/2"
Loose blouses of medium thick fabrics, dresses, jackets, blazers
T-shirts, sweat shirts
16 cm, 6"
Shirts, winter jackets of thick fabrics, light top coats
Loose T-shirts, sweat shirts, sport jackets, jobbing suits
18 cm, 7"
Top coats, sport jackets, jobbing suits
20 cm, 8"
Garments of very thick fabrics
Padded sport jackets, anoraks, top coats
22 cm, 8 5/8"
Loose sport and casual jackets
Padded sport jackets, anoraks, top coats
Ease options in the children's and the babies' bodice blocks
In the babies'/children's bodice macros the ease options are Basic,
Indoor garments and Outdoor garments. You cannot draft patterns to any
garment using the basic ease option. The pattern measurements are very
near to the subjects. If you use this ease option you have to add the
required ease to the patterns yourself.
Lengths
The length of the bodice blocks is measured from the waistline. In
the ladies' and the misses' bodice blocks you can use a length to the
abdomen line or more. If you need a shorter bodice block, cut the pattern
pieces accordingly. In the men's bodice block you can use any length.
The children's and the babies' bodice blocks are always to the waistline.
Elastic fabrics
If you use elastic fabric for the garment, choose the ease category according
to garment type and scale the patterns to account for the stretching in
the fabric. To read of how to determine the elasticity in the fabric,
click here.
It is better to use scaling for elastic garments than to try to
figure out which smaller ease category to choose. If you are e.g. sewing
a T-shirt of jersey or tricot - which does not have a lot elasticity,
choose ease category 16 cm. If you use to the T-shirt more elastic fabric
(like fabrics containing lycra), choose 16 cm ease and scale the patterns
according to the fabric elasticity.
Button extension
With these macros you can produce patterns with or without button extension.
If you want the patterns without button extension, type zero (0) in the
appropriate measurement dialog box. Otherwise type the wanted width
of the button extension.
Button lines
Use the button.mac macro included in this macro collection to
draft button line to the garment if needed. Place button line always on
the CF-line of the garment. The macro asks the number of the buttons
and the length of the button line. Before running the button macro, measure
the required length of it. At the end, the macro asks you to point with
mouse the starting point of the button line (look at the blue command
line at the bottom of the screen). The first button usually is placed
at a distance of about 2 cm downwards from the neck opening. Try to plan
the buttons so, that there is a button at the bust level. In garments
of hip length, button line is normally not extended lower than top hip
(abdomen) level.
Collars
Draft collars to the garment if you want to. Use the collars' macro
included. The macro asks the circumference measurement of the neck opening
of the garment. Note! Not the circumference of the subjects neck. You
can add the collar to the neck opening as it is. You do not need to make
the bigger for the collar. It has been taken into account when programming
the macro.
With the collars macro you cannot draft a tailored collar. Later on I
shall add this to the instructions.
Pockets
Add pockets to the garment using the pockets' macro. First choose
the pocket type and the direction of the pocket (horizontal, slant to
front, slant to back), then point the place of the pocket on the garment.
The measurements of the pocket (pocket width and jetting height) are
asked in the macro dialog box. Typing different measurements you can draft
different size pockets to the garment, e.g. a hip pocket and a
smaller breast pocket. Normal place of the hip pocket in women's garments
is 5 cm upwards from the top hip (abdomen) level and quite near to the
side seam. Normal place of the breast pocket is about 3-5 cm upwards from
the bust point and quite near to the armscye seam. You can examine the
garments drafted with other macros to see how the pockets are placed in
them.
Draft pocket marks first on the garment patterns. Then copy the marks
and draft seam allowances around them to make the patterns for the pocket
pieces.
Using measurement tables
You can use the women's and the men's default measurement tables with
these macros. To read about how to use the measurement tables, click
here.
 Sleeves Sleeves
At this stage there only are normal one-piece sleeves available. Two-piece
sleeves will be added later.
Example of how to use the macros in practice
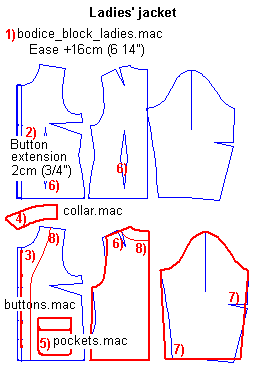
Here is how to draft patterns for a ladies' jacket.
1) run the ladies' bodice block macro using ease option 16 cm
2) type the width of the button extension as 2 cm in the measurement dialog
box. Type the wanted length of the jacket in the measurement dialog box.
3) add button line 2 cm downwards from the front neck opening at the CF-line
4) measure the length of the front and the back neck opening. Decide whether
you want to start the collar from the CF-line or whether you want to extend
it to the button extension outer edge. Run the collars macro to draft
the collar type you want to.
5) run the pockets' macro to draft pocket marks on the front piece. Copy
pocket pieces to make patterns for them.
6) Remove the waist darts and the back shoulder dart
7) Remove sleeve elbow dart and shape the sleeve cuff if you want to
8) draft facings to the front and the back pieces.
9) add seam allowances to the patterns.
More ideas
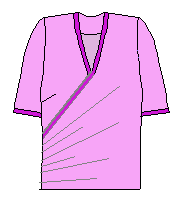
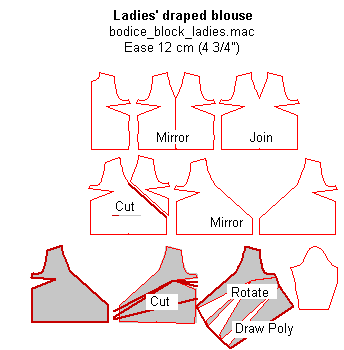
Women's draped blouse
Examine the picture to the left to draft patterns for a women's draped
blouse.
 
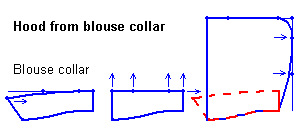
Hoods
Below you find two pictures of how to draft hood patterns using collars
as a basis.


| ![]() Site
Map
Site
Map


 Sleeves


