|
Sewing Instructions For Women's Lingerie
Copyright ©1998-2000 Leena Lähteenmäki,
Järvenpää, Finland

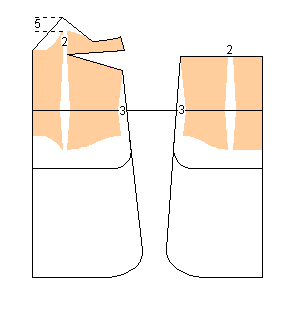
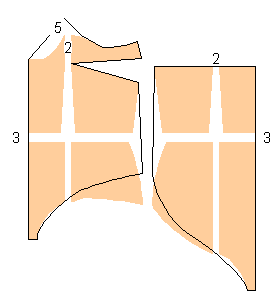
Terminology
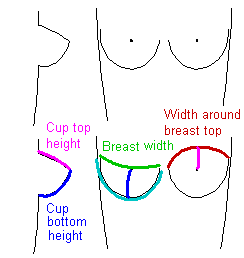
Please refer to picture to get acquainted with the terminology
used.
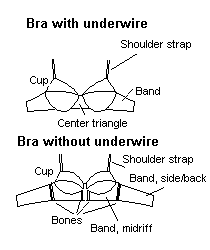
Nowadays most bras are made with underwires. They are of
metal or plastic and are inserted into casings at bottom edge of the cups.
If you cannot find underwires in your fabric shop, you can use used ones
from an old bra. Sometimes you can find bras at very low prices at sales
or in discount stores. If so, it might be worthwhile buying very cheap
bras just for their underwires and - why not - shoulder straps.
Women with a prominent bust are recommended to sew classic
bras without underwires.
Sewing lingerie
To sew your own lingerie to your personal measurements
is most rewarding. With modern sewing machines and sergers it is also
easy and quick. With luxurious fabrics, beautiful laces, lace appliqués
and light lingerie elastics, you can make beautiful lingerie that is all
your own.
PatternMaker Macro Lingerie can be sewn of elastic or non-elastic
fabrics. Use lightweight, easy-care fabrics of cotton, silk or synthetic
fiber content, in either knit or wovens. Buy fabric enough for a test
garment. Sometimes you may need to make a couple of test garments before
you master the sewing and measuring techniques.
Scaling patterns to account for stretching in the
fabric
One of the best features of PatternMaker Macro Patterns
for Lingerie is the fact that patterns can be reduced in size to account
for stretching in the fabric. You will need to calculate the stretching
factors for the fabric you use. Examine how much the fabric stretches
horizontally and vertically and let the program resize the patterns accordingly.
There is a Dialog Box for this purpose in the PatternMaker Lingerie Macro.
You are asked to give Horizontal and Vertical Scaling Factors.
To determine the factors for a particular fabric, stretch
the fabric and measure its elasticity. Fold piece of fabric in two and
stretch it separately in height and width along a ruler. "Height"
is the direction that will be vertical when you put the pattern on the
fabric, and "width" is the horizontal direction. Measure unstretched
and stretched width and height of the fabric. The Scaling Factor needed
is calculated by dividing the measurement of the unstretched fabric by
the measurement of the stretched fabric. Stretch moderately, as the fabric
would stretch on your body.
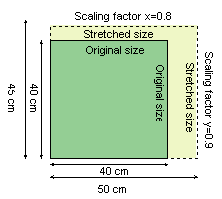
Example:
If the unstretched width and height of the fabric is 40
cm and the stretched width of the fabric is 50 cm and height 45 cm
Horizontal Scaling Factor is 40/50=0.8 and
vertical Scaling Factor is 40/45 = 0.9
In other words, if the fabric stretches 20%, the scaling
factor is 0.8.
The Lingerie Macro does not reduce patterns for bra cups,
bra front center triangle and body front center piece, nor does it reduce
corset patterns. These parts should be made of a non-elastic fabric. If
you sew them of elastic material, make them double thickness or line or
cover them with non-elastic fabric or lace.
Hint : When sewing normal, short bra, always use a vertical scaling
factor of "1". It is better not to reduce height of bra back
panels even if the fabric is somewhat elastic in height.
Hint : If you want the patterns to exactly match your body measurements,
use default scaling factors "1". It is also possible to use
scaling factors greater than "1". In this case, the patterns
are drawn larger than your body measurements i.e. the patterns will have
ease. This might be necessary if you use the waist length bra patterns
to sew an evening top of non-elastic fabric, for instance.
If you sew lingerie entirely of non-elastic fabric,
you have to use scaling factors that are greater than "1". How
much "ease" you have to add, is a question of the model and
the fabric used. If you are not familiar with adding ease to patterns,
it is better to use elastic fabrics.
The Lingerie Macro lets you decide whether your Basic Bodice
(Sloper) that is the basis for all the patterns is drawn along with lingerie
pattern pieces. Use this as a reference to see how the pieces fit the
sloper pattern. By doing so you will see how lingerie patterns are drawn
in relation to basic bodice. The Lingerie Macro drafts the Basic Bodice
patterns with normal ease i.e. bust circumference ease 8 cm (3.2").
Please notice also, that patterns Basic Bodice are not
reduced in scale even if you use scaling factors smaller than 1. Therefore,
if you want to experiment how lingerie patterns are drawn in relation
to basic bodice patterns, use scaling factors of 1.
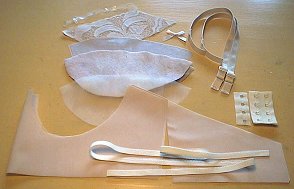
MATERIALS AND NOTIONS
You can order lingerie fabrics and acessories through Internet,
here you have one address  http://www.sewsassy.com/
.
http://www.sewsassy.com/
.
 In
addition to the fabric you will need: In
addition to the fabric you will need:
BRA:
-
narrow lingerie elastic for finishing top and bottom
edges of bra back panels 2 hooks of two-row hook-and-eye tape for
back closing bra underwires, which come in sizes according to measurements
taken under breasts (70, 75, 80 cm etc.)
-
elastic tube band for casings for underwires, or
alternatively, 2 cm wide bias binding tape basted lengthwise in two
-
band for shoulder straps (optional; you can also
make shoulder straps from bra fabrics)
-
shoulder strap adjustment clips (optional)
WAIST LENGTH BRA:
- same accessories as for bra above except for hook-and-eye tape
- a zipper which opens from both ends, or accessories for another
kind of front closing
- bra ribs (bones) or rigid plastic/nylon tape sold for this
purpose to stiffen bra vertical seams. Measure the needed amount of
tape from pattern.
BODYSUIT WITH BRA CUPS:
CORSET:
- corset ribs (bones) or rigid plastic/nylon tape sold for this purpose
to stiffen corset vertical seams (measure the needed amount of tape
from pattern, but note that tape is not inserted in the seam which goes
over bust)
- lace, embroidery and/or lace appliqués for corset top and bottom edgings
- a zipper which opens from both ends or other kind of front closure
- for an adjustable corset, button loop tape and draw string for back
center seam
PANTIES:
LACE, LACE APPLIQUÉS OR OTHER LINGERIE DECORATIONS:
If you want to, you can decorate lingerie with lace. You
can replace part of fabric with lace or lace fabric or you can use lace
fabric to cover the lingerie fabric. Examine ready-made lingerie for ideas.
Before you do this, however, learn the basic techniques for sewing lingerie.
Only after you are familiar with the basic techniques should you try special
techniques or materials.
Hint: If you want to sew a padded bra, use the bra
cup patterns to cut padding from thin wadding or fleece. Line bra cups
and place padding between bra fabric and lining. Cut bra cups a bit larger
than the pattern so that the padding fits inside the bra.
You can also line only the padding and fasten it
into the bottom seams of the cups. In this way - leaving the padding free
at top edges of the cups - you give the padding better form.
Hint: Try sewing bra cups of padded fabric and bra
back panels of elastic fabric matching the color of the padded fabric.
It is quick and easy.
Measuring
For Lingerie Macro you need same measurements as for other
PatternMaker macros (refer to the Ladies’ macro manual for this)
and a few additional measurements. Take the additional measurements according
to illustration hereunder. The easiest way to take the bra cup measurements
is to put on a bra you already have that fits well and take the measurements
from it.
Have a set of the underwires that you will use available
before you start measuring yourself, since the length of these is one
of the measurements you will need.
If you take cup measurements directly from breast, put
bra underwire under the breast and mark its end points (i.e. points A
and B) with non-permanent ink on your skin. Mark point E on your skin
also: it is directly above the breast apex, upwards to the point where
you want your bra’s top edge to be. This point is a design choice
and you can determine it yourself. These marks help you to take the right
measurements.
Do not try to measure yourself - it does not work. Ask
a friend to take the measurements.
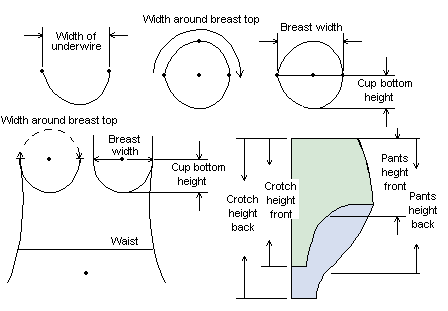
 MEASUREMENTS
IN THE LINGERIE MACRO DIALOG BOX: MEASUREMENTS
IN THE LINGERIE MACRO DIALOG BOX:
- Arc width (place underwire on table and measure horizontally
from one end of underwire to the other)
- Breast width (place underwire under your breast and measure
from one end of the underwire over bust apex to the other end of underwire)
- Width around breast top (as the previous one but not
over bust apex but around top of breast)
- Crotch height front (from CF waist vertically to center of
your crotch)
- Pants height front (from front waistline to edge of leg opening,
measure vertically at the midpoint of CF waist and side)
- Crotch height back (from CB waist vertically to center of your
crotch)
- Pants height back (from back waistline to edge of leg opening
under buttocks, measure vertically at the midpoint of CB waist and side)
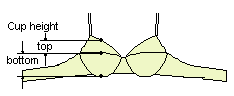 Bra
with arc Bra
with arc
Cup top height = from bust apex vertically to the point where
the bra top edge is wanted to be
Cup bottom height = from bottom of breast vertically to bust apex
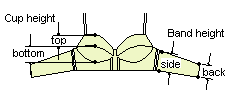 Bra
without arc Bra
without arc
Cup top height = from bust apex vertically to the point where
the bra top edge is wanted to be
Cup bottom height = from bottom of breast vertically to bust apex
Band height, side = desired band height at side
Band height, back = desired band height at CB
Preparing the fabric, cutting and adding seam allowances
If you are not sure that your fabric and laces won't shrink
when washed, prewash and iron them to preshrink them.
Fold fabric in two. Cut the following pattern pieces on
fold: bra center triangles/midriff pieces (2 each).
- bodysuit center front and center back pieces
- corset center front and center back pieces
On the cup patterns there is a two-headed arrow.
This is the grain line. Place the pattern on the fabric so that the direction
of stretch of the fabric is parallel to this arrow. The cups will fit
much better if the pieces are cut this way. If the fabric which you are
going to use stretches in both directions, it usually stretches more in
one direction. In such a case use this as the direction of the grain line.
The center triangles of the bra with underwire and the
midriff piece of the bra without underwire can be cut from a non-elastic
fabric. If you cut these pieces from an elastic fabric, line or overlay
the pieces with non-elastic fabric or lace.
Cut the body pieces of the waist bra and the bodysuit as
well as the pieces for the corset and the panties so that the fabric stretches
horizontally.
The top pieces of the cups can also be cut from a non-elastic
fabric or lace. If you line the cups, use elastic lining fabric for the
bottom pieces of the cups and cut it the same direction you cut the cups.
Add 2 cm seam allowance to seams into which you are going
to insert ribs (waist length bra and corset vertical seams). Add 1 cm
seam allowance to all other seams. Add to panties' top edge a seam allowance
that equals the width of the waist elastic you are using.
Sewing and overlocking
Seams
Best results are achieved when sewing seams with a serger.
If you don't have a serger, sew seams with narrow zigzag. Use at least
3 mm long stitches. Stitches that are too short can break the fabric.
If sewing the garment of non-elastic fabric with sewing machine, trim
seams to 6 mm and overlock seam allowances together with zigzag. Tricot
and lace fabrics do not need overlocking.
 Lace
appliqués and medallions Lace
appliqués and medallions
You can insert lace medallions and motifs cut from lace
fabric on your lingerie. Use transparent tape to position lace inserts
on right side of the garment and stitch near edge, through tape, using
narrow zigzag and medium length. After fastening the lace, remove tape
and cut the underlying fabric with sharp scissors.
Finishing edges
Edge finishes can be done in many ways depending on the
characteristics of the edge. If you want to reduce length of edge (in
leg openings for panties, for instance), use edge elastic or sew transparent
elastic into the seam. Following techniques can be applied for edge finishes:
1)
Bound edge finishes : Cut seam allowance away from edges. Sew
bias binding tape on wrong side of the edge, turn it round edge to the
right side of the garment and sew at edge.
2)
Picot edge finishes : Overlock seam allowance of non-elastic fabric
and turn it to wrong side. Sew on right side with straight stitch near
edge. If you are using elastic fabric, use seam allowance of 2-3 cm. Fold
seam allowance inside and sew on right side with overedge or blanket stitch
along edge. Trim excess fabric away from finished edge close to stitching.
Twin needle is also a good solution and gives a professional look for
this kind of edges.
A beautiful scalloped edging is achieved by using wide
and long overedge stitch, and stitching so that right swing of the needle
stitches over folded edge and the remaining stitches are on the fabric.
Nice but easy wavy picot edging is sewn by using dense zigzag over folded
edge and stretching the fabric tight when sewing. Excess fabric is trimmed
away from the seam after sewing.
3)
Lace-trimmed edges : If the fabric is elastic, the lace must also
be elastic. If you use narrow edge lace, position the lace upside down
on the fabric, right sides together, with straight edge of lace 1 cm (=
seam allowance) from raw edge. Machine-baste elastic near edge. Turn lace
to final position and turn seam allowance inside. Stitch with 3-stitch
zigzag on right side of the garment along edge of lace. Trim excess fabric
from wrong side of garment.
If you use wide edge lace, tape lace in place, wrong side
of lace against right side of garment, and zigzag over tape near edge
of lace. Trim excess fabric from wrong side of garment.
4)
Elastic-trimmed edges : Machine baste elastic to the edge upside
down, right side against right side. Stretch elastic when basting. Turn
elastic to its correct position on inside and topstitch on right side
of the garment with 3-stitch zigzag stretching the elastic when zigzagging.
If the elastic is applied to an edge which will lie flat
when complete (like edges of bra back panels), it needs to be stretched
only a little.
If the elastic is applied to an edge which will be shrunk
when complete (like panties' leg openings), stretch it a little more.
Measure the length of elastics for this kind of edges (waist and leg openings)
around your body. As a rule of thumb you can use the following: length
of the edge elastic is 2/3 of the length of the edge.
Hint : You can use regular narrow elastic to replace edge elastic.
Machine baste it to wrong side of the edge, stretching it while basting.
When turning elastic and seam allowance to wrong side of the garment,
and topstitching the edge with 3-stitch zigzag on right side of the garment,
the elastic is left hidden inside seam allowance.
Waist elastic for panties is fastened in the following
way. Divide elastic and garment edge into fourths; mark both with pins.
Pin elastic to fabric, wrong sides together and edge of elastic even with
raw edge of fabric. Match pin marks. Machine baste close to picot edge,
stretching while basting. Turn elastic to its final position inside the
garment and topstitch with 3-stitch zigzag along bottom edge of elastic.
Elastic is hidden inside waist seam allowance.
Sew lace appliqué or medallion at edge of garment in the
following way. Finish edge of garment using one of the above-mentioned
edge finishing techniques. Position lace, right side up, in its place
on right side of the garment with transparent tape. For edges with elastic
(like at panties' waist), stretch edge when taping the lace in place.
Topstitch lace along its edges with narrow zigzag over tape. Finally,
remove the tape and cut underlying fabric away with sharp scissors.
Hint: You can use lace or lace fabric even in places where
there originally is a seam. E.g. by substituting panties' side seam
with lace, you get a garment without side seam.
Hint: Pieces of lace can be joined by sewing them
together flat with narrow zigzag stitching. First position and tape them
on top of each other, motifs matching. Best result is achieved when the
joining stitching is sewed along a motif. Finally, cut excess lace away
with sharp scissors near stitching.
Hint: If you fasten a broad lace at a curved edge
of a garment, tape it to its place at the edge which will be longer in
the ready garment. Clip the lace from other edge, following motifs, as
necessary to overlap and flatten lace. Tape. Stitch along taped edge with
narrow zigzag. Stitch over clips through overlapped layers of lace, following
motifs, with narrow zigzag. Remove tapes and cut excess lace with sharp
scissors near zigzags.
Hint: Lace edge with corners is done the following
way. Position lace in place and fold it at corners. Tape and sew with
narrow zigzag along edge and folds. Finally cut excess lace away with
sharp scissors.
Shoulder straps
Band for shoulder straps is sold ready-made. Another option
is to sew shoulder straps of garment fabric. This might be necessary if
you don't find band matching the color of your bra fabric. It is also
much cheaper to sew shoulder straps of the lingerie fabric than to use
ready-made shoulder strap band. Use one of the following techniques:
1) Sew a
tube strap of garment fabric (spaghetti shoulder straps). Cut fabric
strip twice as wide as the desired finished width plus seam allowance.
Fold strip in half lengthwise, right sides together, and stitch along
raw edges, stretching the fabric while sewing. Trim seam allowances to
2-3 mm. Turn the strap right side out with a loop turner or a safety pin.
2) Beautiful,
narrow shoulder straps are made of tricot in the following way:
Cut 1-2 cm wide tricot strip crosswise to the grain. Place strip right
side up, stretch tightly to make it roll and sew over it with wide zigzag,
taking care not to catch fabric in stitches.
Hint: This technique can also be applied to sew draw strings
for casual garments!
3)
Flat 3-fold shoulder straps are sewn in the following way: Cut
a fabric strip three times as wide as the desired finished width and fold
it three times lengthwise, wrong side of the fabric inside. Sew along
both edges with picot edge finish (explained above). If the strap is narrow
you can use overlocking stitches or zigzag at center of strap. A twin
needle can also be used. Cut potential excess fabric away from underside
of the strap.
Fasten shoulder straps in place with narrow tight zigzag
stitching. Fasten shoulder straps to back of the garment first and then
find the right places for them at front of garment by trying garment on.
A handy way to fasten shoulder straps is to use 3-stitch zigzag: lower
the feed dog of your sewing machine down and stitch in place.
Test garment
Sew a test garment first. This is necessary for learning
the basic construction techniques. With a test garment you also ensure
that you have taken the measurements correctly and that you have used
correct scaling factors for fabric elasticity when drawing the patterns.
If the garment does not fit, change the scaling factors you have used
or take new measurements.
It is possible that you will have to do more than one test
garment. This is the price you have to pay to learn to sew lingerie. After
you have learned and practiced your techniques, you can sew personal,
well-fitting and beautiful lingerie quickly and at a fraction of store
prices for yourself, for your daughter, for your mother, or for your friends.
You can also use the sewing techniques you have learned to sew swimming
suits and action wear.
Hint: If you want to sew a bodysuit, start by sewing a bra
with underwires. This will give you practice in the most important sewing
techniques for elastic garments. After having sewn bra, sew panties,
which are easy and quick to sew. Then sew a waist length bra. By trying
waist length bra and panties on, you can check that you have used correct
scaling factors: bodysuit is a combination of waist length bra and panties.
To be able to sew a comfortable and well-fitting bodysuit, its height
measurements must be exact. Pay special attention to vertical scaling
factor.
Sewing a bra
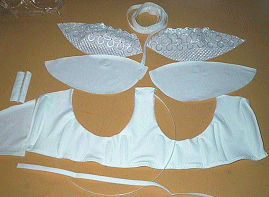
BRA WITH UNDERWIRE

The bra and slip in the picture have been sewn with Patternmaker
lingerie patterns by Thea Botter, the Dutch dealer of PatternMaker.
Cut the bottom pieces of the cup so that the direction of
stretch of the fabric is horizontal. Cut the top piece of the cup so that
the direction of stretch of the fabric is vertical. (Refer to paragraph
"Cutting and seam allowances" above. The top pieces of the cups
can also be cut from lace or lace fabric.
Cut center triangle on double fabric. Sew top and bottom
edges of center triangle pieces, right sides together. Turn triangles
right side out and edgestitch near edges. If you want to fasten a decoration
to center triangle, do it now.
Sew dividing seams for cups, right sides together. Topstitch
seam on right side.
Finish bottom edges of bra back panels with elastic-trimming
technique instructed above. Stretch elastic only a little. (Back panels
should lie flat when ready.)
Sew back panels to cups, rights sides together. Stretch
back panels when sewing. If you find it difficult to combine seams that
curve in different directions, do as follows: First staystitch edge of
back panels 1 cm (= seam allowance) from edges. Clip seam allowances at
1 cm intervals. Now it is much easier to combine the seams.
Finish top edges of back panels and cups continuously with
elastic-trimming technique. When doing this, turn seam where back panels
meet cups towards inside of cups.
Fasten center triangle to cup. Stretch center triangle
when sewing.
Fold center triangle and one back panel on top of one cup,
right sides together. Position tube tape or folded bias tape at bottom
edge of cups. Leave 2 cm of tape over both ends. Sew along inner edge
of tube tape. Fold tape to wrong side of cup and sew along other edge
to form a casing for underwires. Sew casing to other cup in the same way.
Insert underwires into casings. To form stoppers in the casings, fold
inwards and fasten ends of tape at both ends of casings.
Try the bra on to check that the circumference of the bra
is correct and fasten pieces of two-row hook-and-eye tape to ends of back
panels. If you want to provide shoulder straps with shoulder strap adjustment
clips, do it now. Look at your old bra to see how this is done. Fasten
shoulder straps first at back of bra and then by trying the bra on, find
the correct points to fasten them to cups in front.
Another possible order of assembly is as follows: Finish
center triangle as above. Finish top and bottom edges of back panels with
edge elastic before you combine them to the cups. Finish top edges of
cups with edge elastic or lace as well. Fasten center triangle and back
panels only now to cups. In this order of assembly, it is possible to
use other material than edge elastic to finish top edges of cups, e.g.
lace, embroidery or decoration tape. If you do so, sew transparent elastic
at wrong side of top edges of cups to prevent the edges from getting too
loose.
 BRA
WITHOUT UNDERWIRE BRA
WITHOUT UNDERWIRE
Sew bra without underwire according to instructios of the
bra
sewing project on this site.
WAIST-LENGTH BRA
Cut the bottom pieces of the cup so that the direction
of stretch of the fabric is horizontal. Cut the top piece of the cup so
that the direction of stretch of the fabric is vertical. (Refer to paragraph
"Cutting and seam allowances" above. The top pieces of the cups
can also be cut from lace or lace fabric.
Sew halves of cups together, right side against right side.
Topstitch seams on right side.
Sew front, side and back seams of body, right sides together,
with 2 cm seam allowances. Fold seam allowances towards center at front
and at back, and towards back at sides. Stitch seams from right side of
the garment to form 1 cm wide casings for ribs/rib tape. Insert ribs/rib
tape into the casings. Do not extend ribs/rib tapes over top and bottom
seam allowances. Topstitch rib tapes at both ends to prevent sharp ends
from tearing the fabric when you move.
Combine bra body piece to cups in front. Keep body piece
stretched while sewing. Finish top edges of waist length bra with edge-elastic
technique. Start and stop stitching at center front.
Sew tube tape/folded bias tape to wrong side of bottom
edges of cups as with bra with underwire. Insert underwires into casings.
To form stoppers in casings, fold inwards and fasten excess tape at both
ends of casings.
Fasten a zipper or another kind of a closure (buttons and
buttonholes, hooks and eyes, snaps) to center front. Fold inside seam
allowance of bottom edge and edgestitch on right side with 3-stitch zigzag.
Fasten shoulder straps first to back of bra and then try the bra on, to
find the correct attachment points in front, and attach.
Sewing panties
Position crotch pieces right side against right side and
put front crotch between them. Sew. Fold front and back pieces of panties
between the crotch pieces and sew crotch seam at front right sides together.
Turn right side out.
Finish edges of leg openings with edge-elastic technique.
Stretch elastic more in back than in front. Sew side seams.
Cut a suitable waist elastic. Combine ends of elastic flat.
Fasten waist elastic according to instructions above.
For more instructions and hints please refer to the Panties'
Sewing Project on this site.

Sewing a bodysuit / a swim suit
Cut the bottom pieces of the cup so that the direction
of stretch of the fabric is vertical. Cut the top piece of the cup so
that the direction of stretch of the fabric is horizontal. (Refer to paragraph
"Cutting and seam allowances" above. The top pieces of the cups
can also be cut from lace or lace fabric.
Sew halves of cups together, right sides together. Sew
vertical seams of body parts. Set crotch pieces right side against right
side and lay back crotch piece of body part between them. Sew and turn
right side out. Finish edges of leg openings with edge elastic. Stretch
elastic more at back. Combine cups to body piece at front (keep body piece
stretched while sewing). Finish top edge of body piece and cups with edge
elastic. Start and end at side seam. Sew tube tape/folded bias tape to
wrong side of bottom edges of cups to form casings for underwires as for
bra with underwires. Insert underwires into casings. To form stoppers
in casings, fold inwards and fasten excess tape to both ends of casings.
Insert underwires into the casings.
Fasten hook-and-eye tape at crotch. Fasten shoulder straps
first at back of bodysuit and then try the garment on, to find the correct
attachment points in front, and attach. These garments do not have closures
in front or in back. If you are making a swimming suit, don't sew hook-and-eye
tape at crotch.
Hint: If you want to make a body or swim suit without cups,
make a pattern by combining patterns for basic bodice and panties. Use
the basic bodice which is drawn with Lingerie Macro (not the one from
the Ladies’ macro kit), because it is without ease. Another possibility
is to draw patterns combining patterns for panties and pullover (lpullov.mac)
with minimum (= 0 cm) ease. If you use basic bodice, make dividing seams
at front and back or reduce waist dart at side seams. With pullover
macro you can make pattern without dividing seams.
Sewing a corset
Sew corset vertical seams with 2 cm seam allowances. Only
the seam which goes over the breast is sewn with 1 cm seam allowance.
Fasten zipper or other closure mechanism (hooks, buttons) at front. Try
the corset on. If you want it to be tighter, take it in at side seams.
Fold and iron seams at front and at back towards center and at sides towards
back. Topstitch them to form 1 cm wide casings for ribs/rib tape. Insert
ribs/rib tape into the casings leaving top and bottom seam allowances
free. Topstitch rib tapes at both ends to prevent sharp ends from tearing
fabric when you move.
Finish top and bottom edges of corset with lace or embroidery.
Make shoulder straps using corset fabric. Fasten them to top edge of corset.
Fasten garters to corners of front bottom if you want to.
Hint: To make your corset adjustable, sew it with
a back seam and fasten button loop tape and draw strings into back seam.
Draw string can be made from tricot with one of the shoulder strap techniques
above.
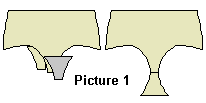
Designing bra cups
Patterns for bra cups can be designed in many ways. You
can make different designs by moving dividing seams of cups to different
places. Instead of sewing cups with horizontal seams, you can sew vertical
seams. The only restriction is that the dividing seam has to go through
the bust apex. There is a notch mark at this point in basic patterns for
bra.
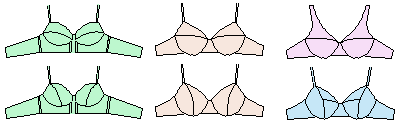
A bra with vertical dividing seams does not sit as well
as a bra with horizontal dividing seams. In the case of horizontal dividing
seams it it possible to cut the cup pieces in different directions with
respect to the elasticity of the fabric. (Refer to paragraph "Cutting
and seam allowances" above).
The top pieces of the cups can also be cut of lace or lace
fabric. If you divide the cups to more than two pieces, try to do it so
that the pieces corresponding to the bottom piece of the basic cup can
be cut with a vertical elasticity of the fabric.
Sewing a half slip using basic skirt macro
Sew half slip of elastic lingerie fabric. Use Ladies’
skirt macro (lskirt.mac) to produce patterns for it. Use skirt front piece
as pattern for front and back piece. Omit darts. Sew side seams, fasten
waist elastic and hem lace with above instructions.
Sewing under pants with legs using basic pants' macro
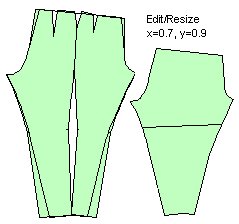
Use basic pants macro lpants.mac. Give circumference of
cuffs a suitable value for this purpose (24-28 cm). Mirror front or back
piece and position pattern pieces side by side at side seams as illustrated
in the picture. Reduce front and back by an amount equal to the
darts and side curve (take this out of the front and back center seams)
and draw new pattern along existing points.
Reduce patterns according to elasticity of the fabric.
Use PatternMaker command Edit - Resize to shrink the entire pattern. In
the illustration, a horizontal scaling factor of 0.7 and a vertical scaling
factor of 0.9 have been used. These factors would be used for a fabric
that stretches 30% horizontally and 10% vertically. Shorten panties to
suit your purposes.
This pattern can also be used for leggings or bike shorts.
Cut waist with seam allowance equal to the width of waist
elastic and cuffs with 5 cm seam allowance. Sew front center and back
center seams, right sides together. Sew crotch seam from cuff to cuff.
Fasten waist elastic according to instructions above. Fold cuff seam allowances
inside and topstitch from right side with twin needle at distance of 3
cm from picot edge. Cut excess fabric away from wrong side of the cuffs.
 Sewing
a full slip or a camisole using corset pattern Sewing
a full slip or a camisole using corset pattern
Add ease to corset front and back pieces, 1.5 to 2 cm per
piece, leaving space at center of the pieces as illustrated in picture.
Cut front side panels from breast apex to side seam (use Edit - Cut command)
and rotate breast dart closed (use Edit - Rotate). Draw new patterns according
to picture: raise front bust corner 5 cm and slope side seams so as to
leave 2 cm extra ease at front and back hip. Continue to the desired length.
Make bottom corners round.
The amount of ease needed depends on the fabric used. If
the garment is too loose, take it in at side seams or draw new patterns
with less ease at center of the pieces.
Sew side seams. Finish top edge with one of the edge finishing
techniques above. Fasten lace appliqués or embroidery if desired. Make
and fasten shoulder straps. Fasten lace at hem according to above instructions.
For more instructions and hints please refer to the Camisole
Sewing Project on this site.
 Sewing
a teddy using patterns for corset and panties Sewing
a teddy using patterns for corset and panties
Draw patterns for a teddy using patterns for corset and
panties. Top part of teddy is same as top part of full slip. Add vertical
ease of 3 cm at waist. Position panties' pattern at this distance from
waist. Cut front and back pieces of panties vertically and position the
pieces matching front/back center and side seams. Leg side seam starts
from upper hip level (abdomen).
Add a seam at waist by cutting this piece in two. Do not
forget to add seam allowance at waist seam.
Sew front darts of top piece. Sew side seams of top and
bottom pieces. Combine top to bottom at waist. Sew transparent elastic
into the waist seam. Finish top edge and edges of leg openings with one
of the edge finishing techniques above.
Finish front and back crotch seams with bias tape or satin
tape and fasten hooks or snaps in it, or use hook-and-eye tape. Fasten
lace appliqués or embroidery if desired. Make and fasten shoulder straps.
RECOMMENDED READING
The following books can be recommended as excellent sewing
books for lingerie. Sewing techniques are explained carefully with text
and color photos. The books also give a lot of ideas for making and decorating
lingerie.
-
Kerstin Martensson: Sewing Lingerie (Kwik-Sew's)
ISBN 0-913212-14-8
-
Kerstin Martensson: Swim & action wear (Kwik-Sew's)
ISBN 0-913212-18-0
-
Singer Sewing Reference Library: Sewing Lingerie
ISBN 0-86537-261-2
If you cannot find these books at your local bookstore, you can order
them from either of these exellent
Internet book stores :
Fabrics and accessories
You can get lingerie
fabrics and accessories through Internet , here you have a couple
of addresses:
Spandex House
SewSassy
Clotilde
Nancy's Notions
Élan Patterns & Supplies
Fabric.Com
| 