|
PatternMaker Collection For Newborn Babies
Download pattern collection
To buy and download the pattern collection please go to http://www.patternmakerusa.com.
Sewing instructions, general
Seams
Sew seams with narrowish medium long zigzag or with serger. Trim seam
allowances if necessary.
Facings
Overlock the edges of the facings (sleepsuit bibs and body crotch) with
zigzag or with serger. Iron interfacing to the wrong sides of the facings
if necessary. Pin the facings in place to the wrong side of the garment
and attach when you sewing the bound edges.
Hems and casings for elastics
Sew hems and waistline casings with double needle from right side of the
garment. Trim seam allowances if necessary.
Edgings
Finish raw edges with bindings as follows. Cut 6 cm (2 3/8")
wide strip from elastic fabric (same fabric as you use for the garment
or other fabric) so that the fabric stretches horizontally. Fold the strip
lengthwise in two wrong side in. Sew it to the wrong side of the edge
with a seam allowance of 1 cm (1/4"). Stretch when sewing. Trim seam
allowance. Turn the strip over the edge to the right side of the garment
and edgestitch along the inner edge of the binding with double needle
if available.
Note! The edges stretch when the garment is used. So tauten them quite
firmly when attaching them to the garment. The best result is reached
if Framilon (transparent elastic) is sewn along with the edge. First machine
baste Framilon to the edge. Do not stretch. Framilon stretches enough
when going under the presser foot.
The technique of bound edges is dealt with in the  general
sewing instructions. general
sewing instructions.
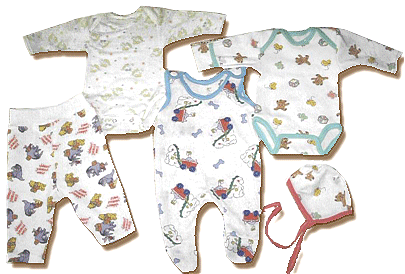
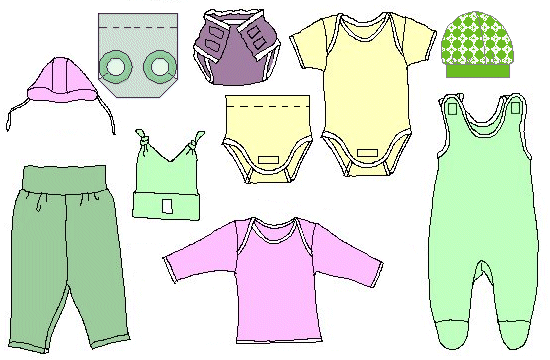
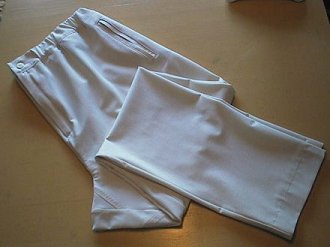
Pattern sizes
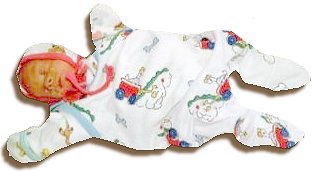 In
the babies'pattern collection there are patterns for sleepsuit, body,
two panties, pants with long and short legs, blouse and three caps as
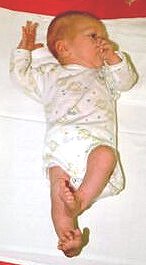
well as diaper covers. The patterns are in sizes 44-50-56-62 cm, 17 3/8-19
3/4-22 1/16-24 3/8-26 3/4 in (the smallest size is for premature infant,
see photo).Patterns for diaper covers are in sizes 50-56-62-68-74 cm.
19 3/4-22 1/16-24 3/8-26 3/4-29 1/8 in. In
the babies'pattern collection there are patterns for sleepsuit, body,
two panties, pants with long and short legs, blouse and three caps as
well as diaper covers. The patterns are in sizes 44-50-56-62 cm, 17 3/8-19
3/4-22 1/16-24 3/8-26 3/4 in (the smallest size is for premature infant,
see photo).Patterns for diaper covers are in sizes 50-56-62-68-74 cm.
19 3/4-22 1/16-24 3/8-26 3/4-29 1/8 in.
Garment sewing instructions
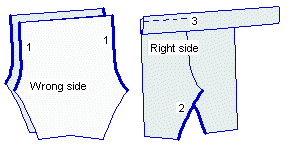
Sleepsuit
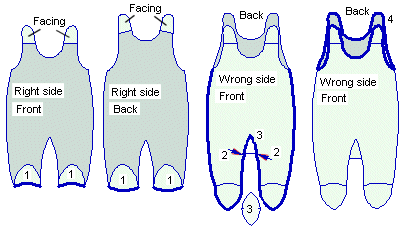
1. Sew the foot tops and bottoms to the leg cuffs.
2. Sew one side seam, continue around the foot and along the inside seam
of the leg to the place marked with number 2 in the picture. Sew the other
side seam and leg accordingly starting from the point marked with number
2 in the picture.
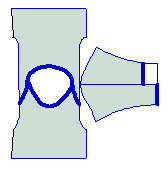
3. Sew the crotch piece to the opening at the suit crotch.
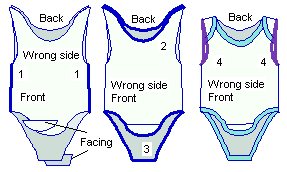
4. Pin bib facings to the wrong sides of the bibs. Sew bound edges to
the top edges of the sleepsuit.
5. Sew buttons and buttonholes or pieces of Velcro to the bibs.
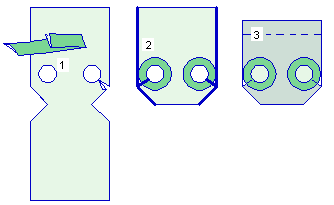
  Body Body
1. Sew side seams.
2. Sew bound edges to the top edges of the body.
3. Pin the crotch facings to the wrong sides of the front and back crotches.
Sew bound edges to the bottom edge of the body.
4. Pin the shoulders of the body on top of each other according to shoulder
marks on the patterns. Sew bound edges to armholes.
Sew pieces of Velcro to front and back crotch.
Panties using the body patterns
Cut away the upper part of the body patterns. Add 1 1/2-2" of
extra height to the top edge of the panties for waistline casing. Sew
panties applying the body sewing instructions.
  Blouse
using the body patterns Blouse
using the body patterns
Cut away the bottom part of the body patterns. Add 1 1/2-2" of
length to the bottom edge of the blouse for hem allowance. Sew the blouse
applying the body sewing instructions. Sew side seams, however, only after
you have sewn the sleeves flat to the sleeve openings. Sew side seams
and sleeve seams as one process from the blouse hem to the sleeve cuff.
Please note that there are two versions of sleeves, one-piece and two-piece
sleeve. The back piece of the two-piece sleeve is longer than the front
piece. The cuff of the two-piece back sleeve is folded around the front
sleeve cuff to form a "bag" for the baby's hand. Alternatively
the sleeve cuff can be left open folding the back sleeve cuff on top of
the back sleeve.
Do as follows:
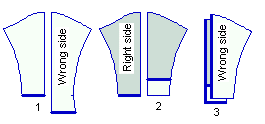
1. Sew bound edges to the sleeve cuffs.
2. Turn the cuff of the back sleeve according to the fold marks on the
pattern right side in.
3. Place the front and the back pieces of the sleeve on top of each other
right sides together and sew the center seam of the sleeve. Handle the
sleeve from this on as it would be a one-piece sleeve. Other side of the
back sleeve cuff fold is sewn along with the sleeve inside seam.
  Pants Pants
1. Sew the center front and back seams right side against right side.
2. Sew the crotch seam from leg cuff to leg cuff.
3. Sew the waist band vertical seam. Fold the waist band lengthwise into
two right side out and sew to the top edge of the pants. Stretch the waist
band when sewing.
Turn the hem allowances of the leg cuffs inwards and sew with double
needle from the right side of the garment.
 Panties Panties
1. Cut open the round leg openings. Cut a seam from the leg openings
to the bottom of the side seams.
2. Sew bound edges to the leg openings. Sew the seams cut from the leg
openings to the bottom of the side seams as narrow as possible from the
wrong side of the panties.
3. Fold a waistline casing to the top edge of the panties and sew with
double needle. Trim seam allowance if necessary. Feed elastic into the
casing if necessary.
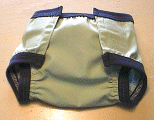 Diaper
covers Diaper
covers
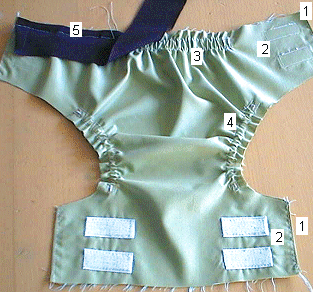 Cut
the diaper covers double. Use fabric for outdoor garments or other water
resistant fabric. Cut
the diaper covers double. Use fabric for outdoor garments or other water
resistant fabric.
1. Place pieces on top of each other right side against right side. Sew
along the front and back edges. Turn the garment right side out and edgestitch
front and back edges.
2. Sew pieces of Velcro to the right side of the front edges and to the
wrong side of the back edges according to marks on the patterns.
3. Sew a casing for elastic to the top of the back pant through two layers
of fabric. Feed elastic into the casing. Attach its ends with vertical
stitch lines.
4. Sew casings for elastic to the leg openings through two layers of fabric.
Feed elastic to the casing and attach their ends with vertical stitch
lines.
5. Sew bound edge to the top edges of the pants front and back.
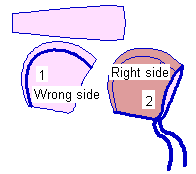
 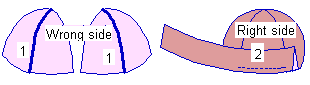 Caps Caps
Sew this cap from elastic fabric only.
1. Join the top pieces of the cap two and two together. Then join the
cap halves to each other.
2. Sew the vertical seam of the cap band. Fold the band lengthwise into
two wrong side in and sew it to the bottom edge of the cap right side
against right side. Stretch the band when sewing. Attach a decorative
label or an application to the CF of the band.
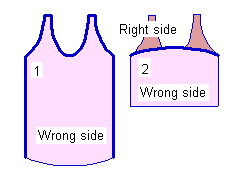 Sew
also this cap from elastic fabric only. Sew
also this cap from elastic fabric only.
1. Sew the side and the top seams of the cap.
2. Overlock the bottom edge of the cap with zigzag or with serger. Fold
the bottom half of the cap according to the marks on the pattern on top
of the top half of the cap and attach with a couple of invisible hand
stitches to the side seams.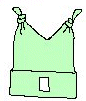
Turn the cap right side out and fold the bottom edge up. Attach a decorative
label or an application to the cap. Bind knots to the top corners of the
cap.
The third cap in the newborn babies' pattern collection can also be sewn
of non-elastic fabric. Cut the pieces two times, one for the cap and one
for the lining. If you do not use ready-made band for the cap ties make
them from the cap fabric. For instructions please refer to the instructions
of how to make shoulder
straps for lingerie.
 1.
Sew darts in the side sections of the cap and the lining. Attach the top/back
sector of the cap to the side sectors. 1.
Sew darts in the side sections of the cap and the lining. Attach the top/back
sector of the cap to the side sectors.
2. Place the cap and the lining within each other wrong sides together
and machine baste the raw edges together. Put the cap ties in places between
the cap and the edge binding on the wrong side of the cap upside down.
Sew a bound edge to the raw edges of the cap. Finally, turn the cap ties
downwards and attach with a few stitches to the edge binding.
| 