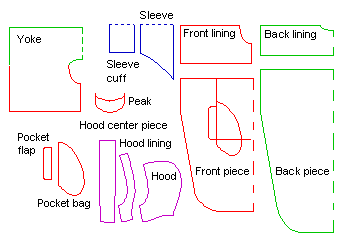
In the table are the sizes available for the rain cape patterns. Sizes
are on different layers of the drawing. Close the sizes (layers) you do
not need, arrange patterns for printing and print.
To install you need a password. You get the password when you buy the
pattern collection. The price of the pattern collection is € 12.50
General
 The
top part of the cape is double. The inner parts of the front and back
tops form a lining and are made from fleece or flannel or other breathing
fabric. The yoke on top is made from raincoat fabric or other watertight
fabric. It is attached to the hood's neck seam and to the armscyes and
is left open at hem The meaning of this construction is to secure ventilation
in the garment.
If you want to make an impressive and colorful cape, cut different
pieces from fabrics of different colors, plain or patterned.
Seam allowances and seams
Add 1,5 cm (5/8") wide seam allowances to the seams which are
topstitched and 1 cm (3/8") wide seam allowances to other seams.
Add 5 cm (2") wide seam allowances to the bottom edges of the yoke.
If the fabric is raveling, finish the seams with zigzag or with serger.
Topstitch the seams from the right side of the garment at a distance
of the presser foot from the edge. Use 0,5-0,6 cm (1/8-1/4") stitch
length. If you want to make the seams decorative, use thread of contrasting
color.

Drawstrings
Read hints of how to make drawstrings from the  sewing
instructions for the lingerie shoulder straps.
Pockets
On the front piece there is a big patch pocket and two flap pockets.
You do not need to sew both, if you don't want to.
Add 3-4 cm (1 1/2") wide seam allowance to the vertical edges
of the patch pocket and 1 cm (3/8") wide seam allowances to the
other edges. Iron the vertical and bottom seam allowances to the wrong
side and topstitch at top for pocket mouths according to the picture.
Prepare and edgestitch the pocket flaps.
Sew the patch pocket to the front piece along the vertical and the
bottom edges. Sandwich pocket flaps to the bottom of the vertical seams.
Leave the pocket mouths and the top edge of the patch pocket open. Sandwich
the pocket top edge between the front lining and the front piece when
sewing this seam.
Read sewing instructions for flap pockets in the  general
sewing instructions. Use window pane method and hide the pocket
mouths under the flaps. When the pockets are ready, edgestitch the ends
of the pocket flaps through all layers of fabric.
SEWING ORDER
 Hood
Hood
1. Sew the hood center piece to the hood side pieces. Topstitch the
seams. Sew buttonholes to the front edges of the hood according to the
marks in the patterns for drawstring openings.
2. Cut the hood peak in two copies from the garment fabric with seam
allowances and one copy of cardboard or plastic without seam allowance.
Sew the peaks together right side against right side. Turn the peak
right side out, put the cardboard/plastic piece inside it and topstitch
the front edge of the peak. Baste along the inner edge of the peak.
Baste the peak to its place right side against right side.
 Attaching
the hood to the yoke
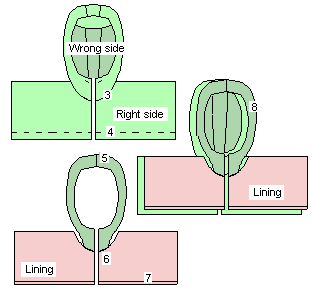
3. Attach the hood to the neck opening of the yoke right side against
right side. If you want a neat seam, cover it with bias tape.
4. Fold the hem seam allowance of the yoke to the wrong side and topstitch
from the right side of the yoke.
Attaching the hood facing to the lining
5. Sew the top seam of the hood facing right side against right side.
6. Sew the bottom edge of the hood facing to the neck opening of the
front lining.
7. Fold in and baste the seam allowance of the CF-edges of the lining.
Sew front and back linings to the bottom pieces of the cape. Leave space
for the zipper between the CF-edges of the lining. Sew the shoulder
seams of the lining.
8. Pin the front lining with the hood facing on top of the yoke with
the hood right side against right side.Pin the zipper edges under the
CF edges of the yoke. Sew along the CF-edges and around the hood front
edge. Do not attach the CF-edges of the lining to the zipper edges of
the yoke. Cut clips on the curved areas of the seam.
Turn the hood and the yoke right side out. Pin the folded CF-edges
of the lining under the zipper edges of the yoke. Topstitch the hood
front edge and the zipper edges. The CF-edges of the lining are sewn
to the seam. Sew another line of stitches to form a casing for the drawstrings
leaving the buttonholes in the middle of the casing.

Bottom edges of front and back pieces
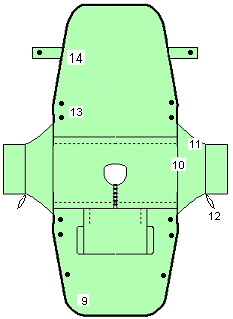
9. Finish the bottom edges of the front and the back pieces with separate
strips of fabric. Read instructions in the  general
sewing instructions.
Sleeves
10. Baste the armscye edges of the front and the back lining to
the armscye edges of the yoke. Attach the sleeves to the armscyes. Topstitch
seams.
11. Sew sleeve seams. Sew sleeve cuff seams. Fold them in two wrong
side in and sew them to the sleeve ends right side against right side.
Topstitch the seam.
12. Cut 2 pieces of elastic, each 10 cm (4") long. Sew them as
loops in the sleeve cuff seam according to the picture. You can slip
your thumbs in these loops to keep your sleeves from
rolling up for example when you ride a bicycle. Topstitch cuff
seams. Fold half of the cuffs on top of the right side of the sleeves.
Snaps
13. Hit no-sew-snaps to the armpit of the cape front and back pieces
according to the picture.
14. Prepare the tamps and attach them to the back piece, middle way
from the snaps and the hem as in the picture. Hit no-sew-snaps to their
outer ends and corresponding counter snaps to the front piece. With
the tamps you can secure that the cape hem does not open in wind.
![]() Site
Map
Site
Map


 The
top part of the cape is double. The inner parts of the front and back
tops form a lining and are made from fleece or flannel or other breathing
fabric. The yoke on top is made from raincoat fabric or other watertight
fabric. It is attached to the hood's neck seam and to the armscyes and
is left open at hem The meaning of this construction is to secure ventilation
in the garment.
 Hood
Hood Attaching
the hood to the yoke