|
PatternMaker Sewing Projects:
Jacket with removable sleeves
Types of fasteners
If you want to sew a jacket with removable sleeves, there are many alternatives.
As fasteners you can use
1) zippers
2) buttons
3) no-sew snaps
4) fabric- or leather-covered snaps
5) snap tape
6) hook-and-loop tape (Velcro)
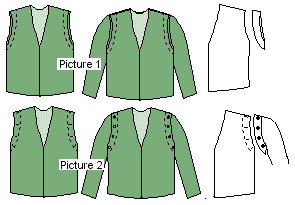 Preparing
the armscyes Preparing
the armscyes
Armscye facings
The sleeves can be fastened to the armscyes without no changes
in the shell pieces. The fasteners can be hidden (picture 1)
or visible (picture 2). In these design alternatives the
armscyes are finished with facings. Facing must be topstitched - unless
you use zippers and the lapped application as suggested below - to keep
the sleeves in place when fastened under the facings.
How to draft facings to the armscys and the sleeve caps
using the editing tools of Patternmaker is described in Exercise 24 in
the  Design
Tutorial: "Drafting facings". Design
Tutorial: "Drafting facings".
When using zippers as fasteners, use the lapped application
to hide the zipper under the lap. This method is described in "Attaching
zipper to pants or skirt" in the  General
Sewing instructions. Topstitch the lap with hand stitching, machine
blind stitching or plain maching stitching. General
Sewing instructions. Topstitch the lap with hand stitching, machine
blind stitching or plain maching stitching.
 Armscye
with a flange or a pleat Armscye
with a flange or a pleat
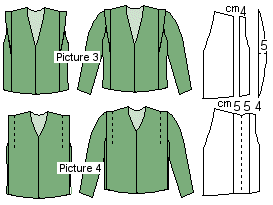
The fasteners can be hidden under a flange (picture 3)
or pleat (picture 4).
Alter the front pattern pieces according to the pictures
to the left.
Preparing the sleeve cap
Always sew the side seam of the shell and the sleeve seams
before attaching fasteners or facings to them.
If you use zipper you can attach it directly to the sleeve
cap. Use added seam allowance (picture 5A) to be able to place
the zipper 0.5-1 cm outwards from the original sleeve cap seam line.
After having sewn one edge of the zipper to the sleeve cap,
close the zipper and position the sleeve under the armscye matching armscye
edge and the original sleeve cap seam. Baste or pin the other edge of
the zipper to its place. Topstitch it from the right side of the armscye.
The zipper will be hidden under the zipper lap.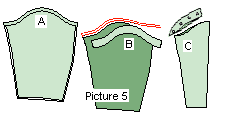
Another way is to sew a facing to the sleeve cap and sandwich
the zipper between the sleeve cap and the facing (picture 5B).
The third alternative is to sew another armscye facing
and to attach sleeve to it as you would sew the sleeve to the garment
armscye (picture 5C). Sandwitch zipper between the sleeve and the
facing. If you use buttons, snaps or pieces of hook-and-loop tape, sew
them to the facing sewn to the sleeves and the the counter parts to the
armscye facings.
Whichever alternative you choose you have to secure that
the sleeve cap ease is preserved. Here is a good method to handle the
cap ease.
Cap ease
When using the dropped sleeve design there is no need to
use ease in the sleeve cap. If you use a fitted sleeve cap design you
have to secure that the sleeve cap ease is preserved.
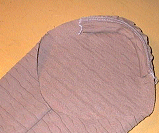 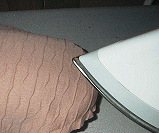 Here
is a good method to handle the cap ease. Cut a 5 cm/2" wide bias fabric
strip or from a stretchy fabric. Fold it in two and sew to the sleeve
head as in the photo at the distance of the seam allowance from the edge
stretching the strip as much as possible when sewing. Here
is a good method to handle the cap ease. Cut a 5 cm/2" wide bias fabric
strip or from a stretchy fabric. Fold it in two and sew to the sleeve
head as in the photo at the distance of the seam allowance from the edge
stretching the strip as much as possible when sewing.
The strip will gather the sleeve cap and is very easy to
handle when sewing sleeves to the garment. The strip also gives the needed
support to the sleeve cap and gives it a nice, round shape. When attaching
a zipper to the sleeve cap - or the sleeve to the armscye - stitch to
the ditch i.e. along the earlier stitch line.
| ![]() Site
Map
Site
Map


 Preparing
the armscyes
 Armscye
with a flange or a pleat

 Here
is a good method to handle the cap ease. Cut a 5 cm/2" wide bias fabric
strip or from a stretchy fabric. Fold it in two and sew to the sleeve
head as in the photo at the distance of the seam allowance from the edge
stretching the strip as much as possible when sewing.